Nowadays, using drones to take aerial shots or film videos has been a go-to choice for photographers and YouTube content creators. However, it’s one thing to learn how to fly your drone; it’s quite another to edit drone footage into a compelling video, esp. for the beginner.
So, if you are new to drone video editing, in this tutorial, we will walk you through how to use the DJI FLY app and a versatile online video maker to edit your drone footage into a sizzling video, plus loads of actionable strategies. Let’s get into it, now!
Here’s what you’ll learn:
How to Edit Drone Footage by DJI Fly App
As the world’s leading drone manufacturer, DJI offers a free and native app,i.e. DJI Fly, for editing drone footage on both IOS and Android users. For beginner drone pilots, the DJI Fly app is your all-in-one app for flying, shooting, and editing drone footage.

Edit drone footage with the DJI FLY app.
To do so, you need to download the original drone footage from your drone (select the Aircraft option in the DJI FLY app) to your phone first. It takes quite a while for downloading. Make sure your DJI drone has enough battery and your drone and controller are well-connected.
1. Import drone footage to DJI Fly App
Once you have your drone footage downloaded to your phone, you can tap the Create button > tap Template to apply a ready-made template for your drone footage or tap Pro and select the downloaded footage and tap Add to edit them as you wish.
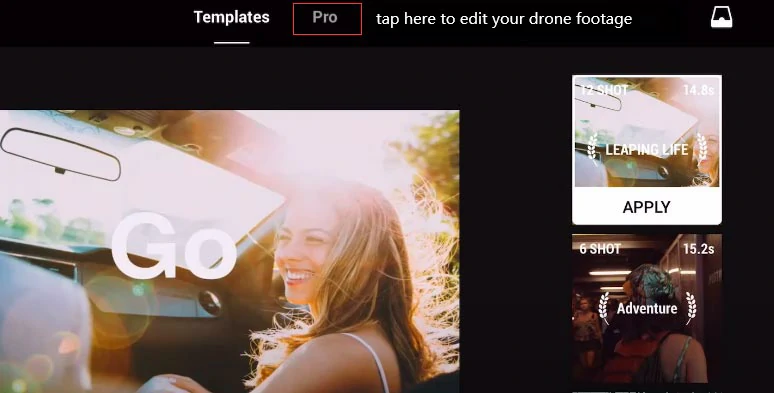
Tap Pro to edit your drone footage as you wish.
2. Split and Trim the Drone Footage
You can use your fingers to unpinch the clip on the timeline to discover any unwanted video moment you want to delete. Then tap the Cut icon, which is a scissor, to split the clip and delete any unwanted or shaky video moment. Check how to stabilize a video in video editing.
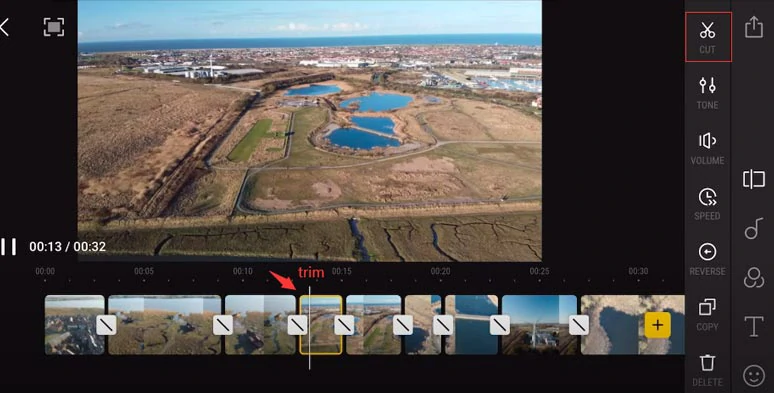
Split or trim the drone footage by DJI Fly App.
To trim your drone footage, just tap and drag the two ends of the video slider inward. Then you can trim the drone video.
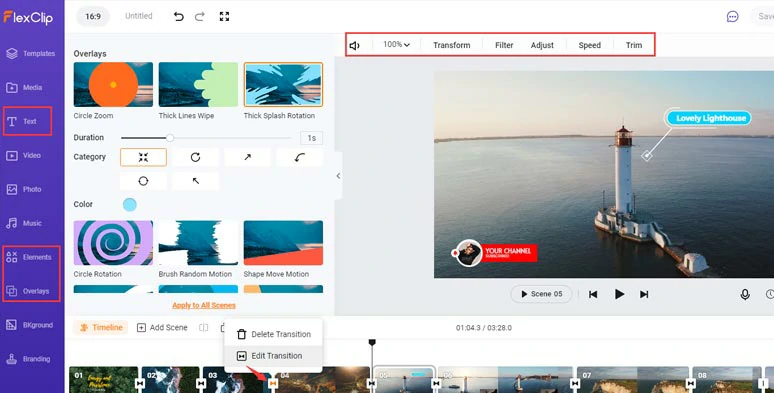
3. Add a Transition between Two Drone Clips
After you split a clip, then you can tap the in-between area and add a video transition, such as dissolve, blur, black, white, or swipe, to your drone footage.

Add a video transition to drone footage by the DJI Fly app.
4. Adjust the Tone of Your Drone Footage
Tap the Tone icon, then you drag the slider to adjust the video brightness, contrast, vignette, and sharpness of the drone footage. Or color grade your drone footage by adjusting the parameter of temperature (cool or warm color tone), and saturation (richness of the color).
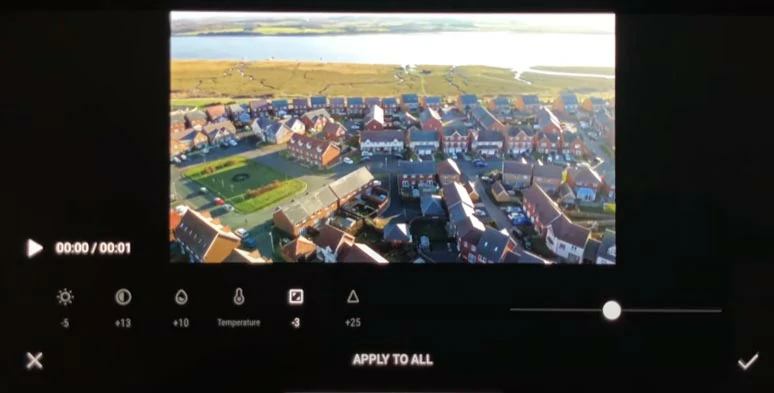
Adjust the tone of the drone footage.
5. Adjust the Volume of Drone Footage
Tap the Volume icon. Then you can lower or increase the volume of the drone footage.
6. Speed Up or Slow Down the Drone Footage
To speed up or slow the drone footage is a frequently-used edit to create the rhythm and vibes for your drone video. Also read, how to speed up a video online and on iPhone.
Tap the Speed icon, then you can drag the slider to the left to slow down your drone footage from 1x to 0.25x or drag the slider to the right to speed up the video up to 4x faster.
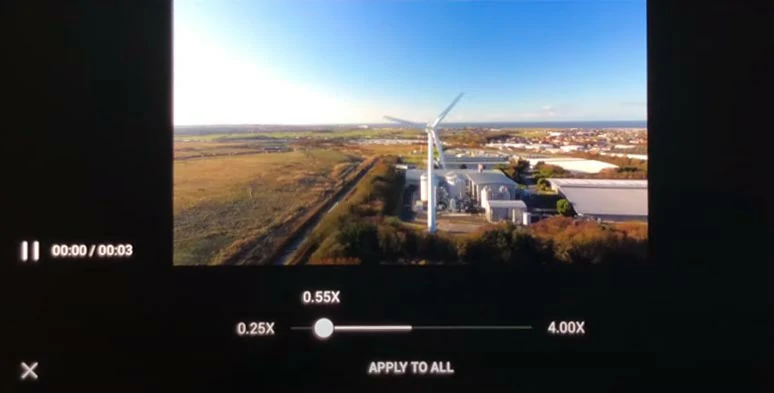
Slow down or speed up drone footage.
One thing to mention is that if your drone footage was filmed at 24/30FPS, just don’t slow down the speed too much, otherwise the footage will get choppy.
7. Reverse the Drone Footage
If you want to draw viewers’ attention to small details in the drone footage or repeat the amazing video moments, what you need to do is reverse the drone video. Check 5 ways to reverse a video online.
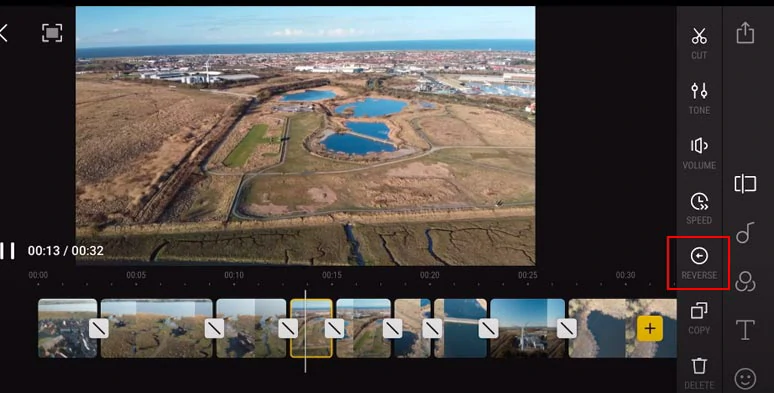
Reverse the drone footage with the DJI Fly app.
Simply tap the Reverse button, then the drone footage will play backward. So, you can create a sort of Instagram boomerang effect (play back and forth), with a short normal clip combined with a reversed clip.
8. Add Free Music to Drone Footage
On the far right corner, you can tap the Music icon to add free music (such as powerful, pop, funky, cheerful, carefree, uplifting, epic, etc.) or tap the Local button to import music on your phone to your drone footage. Then, you can see the audio track with audio waves appear on the timeline as well. So, you can cut to the beat to add rhythm to your drone footage.
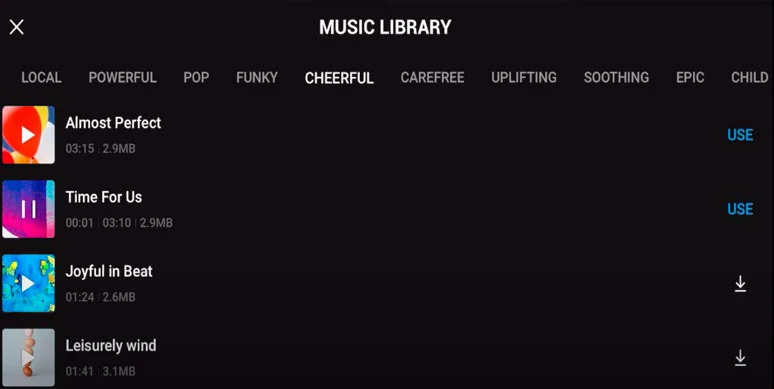
Add free music to drone footage from the DJI Fly app’s music library.
9. Apply a Video Filter to Drone Footage
Tap the Filter icon, which looks like a color wheel. Then, the DJI Fly app offers you dozens of video filters you can apply to your drone footage. It is another way to color grade your drone footage. Once a filter is applied, you can adjust its intensity by dragging its slider as well.
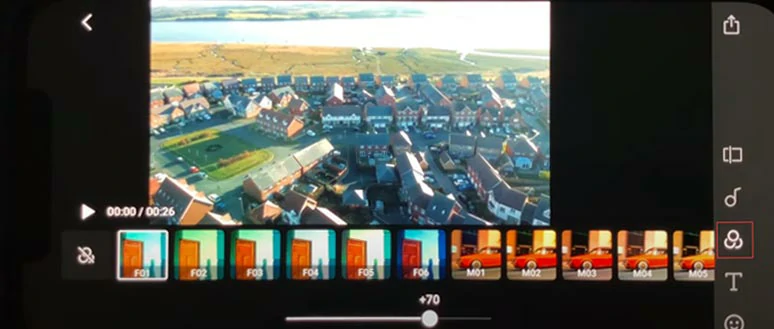
Add a filter to drone footage by the DJI FLY app.
10. Add Titles to Drone Footage
Tap the T icon, which means title and text, then you can select a ready-made title and add it to the drone footage and type in your texts.
11. Add Stickers to Drone Footage
Tap the Sticker icon, you can add built-in stickers to your drone footage.
12. Change the Aspect Ratio of Drone Footage and Export It
Tap the Viewfinder icon on the top left corner, then you can set the video aspect ratio to 16:9; 4:3; 1:1; 3:4; 9:16) for Instagram and tap the Export button and select the video resolution (720P or 1080P) and keep downloading the final video to your phone.
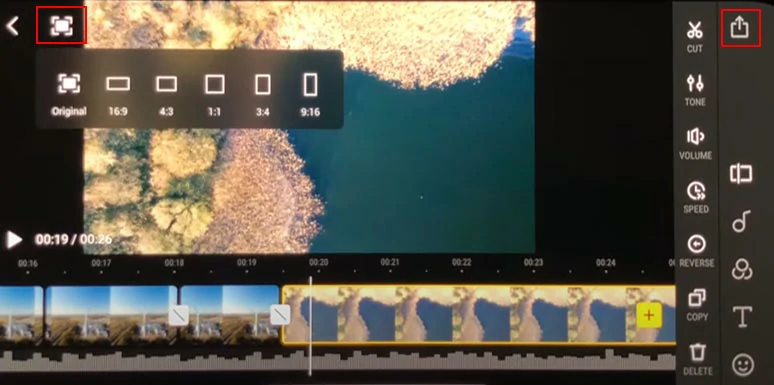
Set the aspect ratio of the final drone video and export it to your phone.
How to Edit Drone Footage by FlexClip Online
Well, though the free and official DJI FLY app offers you an easy way to edit drone footage on your phone, you can’t add multiple music or transition sound effects to your drone footage. Besides, the limited video transitions, video templates, text animations, stickers, etc. make it hard for your drone videos to stand out from a sea of content creators on YouTube.
So, another great workaround for you to edit drone footage on both Mac and Windows is using an easy-to-use and feature-packed online video maker--FlexClip. No software download and experience are needed.
Use FlexClip online video maker to edit drone footage

As opposed to DJI Fly app, with FlexClip, you can:
1. Select a Free Video Template to Begin with
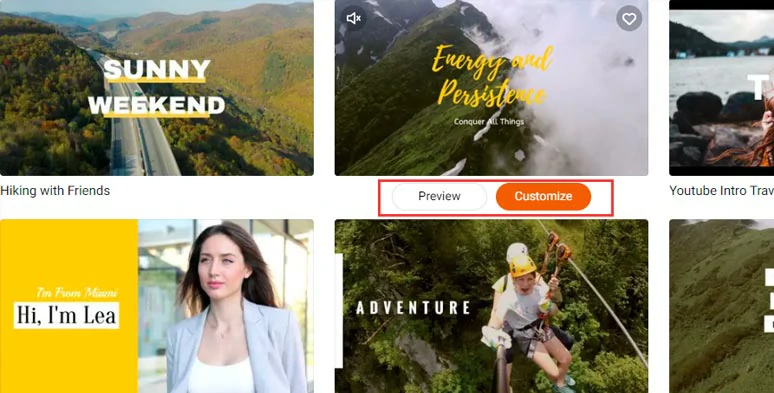
Select a video template to edit your drone footage.
2. Upload Your Drone Footage to FlexClip from Your Phone or PC
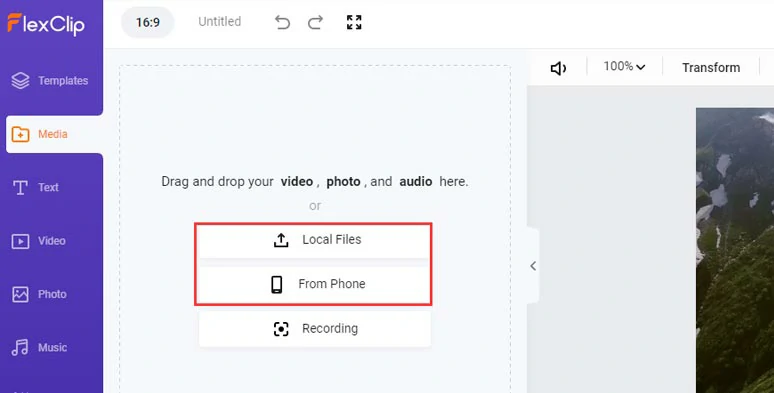
Upload drone footage to FlexClip.
3. Replace Pre-made Videos and Images with Yours
Drag and drop your drone footage and images to replace the pre-made videos or images in the template.
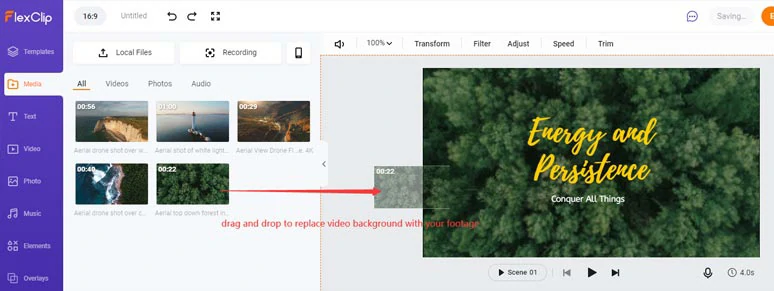
Drag and drop to replace the default video background with your drone footage.
4. Do the Rough Cut
Click the “+” button to add the rest of the drone footage to the timeline. Then you can play the clip and drag the slider inward to trim clips or use the Split tool to cut a clip into two and delete the shaky or unwanted video moment or drag and drop the clips to adjust the sequence of the drone footage.

Trim or split drone footage and adjust its sequence on the timeline.
5. Customize Text Animations
Double-click the ready-made texts, then you can type in your texts, and customize the text styles, text animations like typewriter effect, etc., color schemes, fonts, size, layer, opacity, and trim the duration of text animations to decide when each text should pop up and disappear. Or you can click the Text tab and scroll down to find more call-to-action text animations, such as lower thirds, call-out titles, social media, etc.
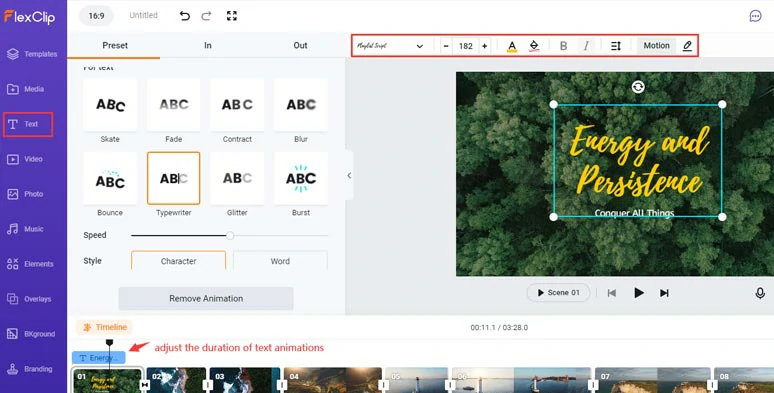
Customize the texts and their styles and animations, etc.
6: Add B-roll with Picture-in-picture Effect
Find the video moments where you need to add B-roll, then click the Picture-in-picture icon to add a video/image into the drone footage for enhancing the storytelling. You may use the crop mask the add a video frame to the pip video/image as well.
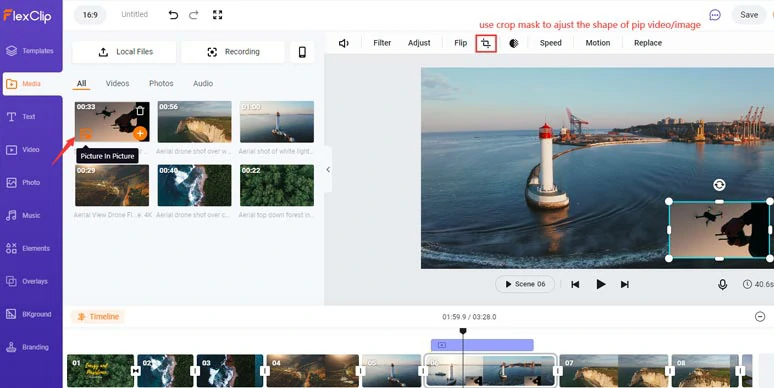
Use the picture-in-picture effect to add B-roll drone footage for storytelling.
7. Spice up Your Drone Footage with More Video Effects
Add trendy fluid video transitions between two drone scenes; speed up (up to 8x) or slow down ( down to 0.2x) the drone footage to add rhythm and emotions, or add more dynamic elements from the Elements tab, such as shapes, like and subscribe buttons, arrow, speech bubbles, illustrations, etc.; or apply a video filter or manually color-grade the drone footage.
Add more video effects like transitions and call-to-action animations, etc to drone footage.
8. Add Free Music and Sound Effects
Go to the Music tab where you can find thousands of royalty-free music and sound effects. Scrub through your video on the timeline and add multiple pieces of music and sound effects to exactly where you need them. You can adjust music volume, apply fade in/out effect or trim the duration of music and SFX. Check how to create fade-to-black effects for videos.
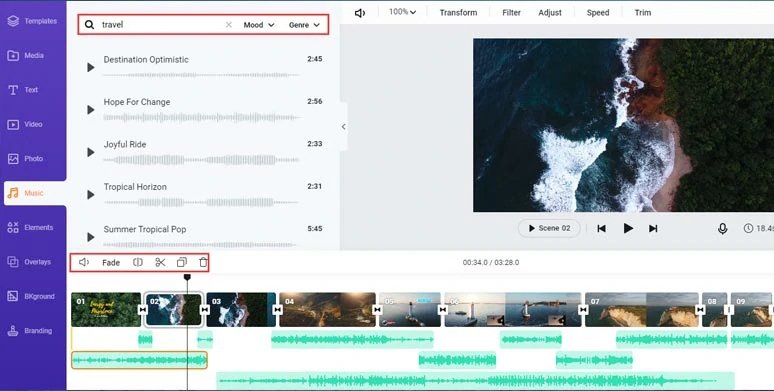
Add multiple free music and sound effects to your drone footage
9. Preview and Share
Done with the editing. Click the Export button to directly download the 1080P MP4 video to your local PC or share it on YouTube, Google Drive, and Dropbox. A clickable link and embed code are also available for your blog or a private share.
6 Best Practices for Editing Drone Footage
As the saying goes that the difference between ordinary and extraordinary is that little extra. Here, we’d like to offer you some of the best practices for editing your drone footage. So, you can avoid the pitfalls made by many amateur drone pilots.
1. Preferably shoot in log
Color-grading your drone footage is one of the effective ways to add a cinematic touch to your drone videos in video editing. To enjoy the maximum dynamic range and avoid the loss of details in highlights and shadows as you adjust the video brightness and color-grade your drone footage, shooting in D-log mode in a DJI drone is a must, even if it means a larger file size.
2. Only pick the smooth and stable drone footage
As you trim or split drone footage, delete clips when you turn the drone around or tilt the camera up and down for the shot, etc. This footage will make your drone video look unprofessional and often involve shaky video images.
3. Stabilize your shaky drone footage
Although nowadays many DJI FPV drones have better image stabilization, there are times when shaky footage does occur esp, there is strong turbulence or you use a DJI FPV drone for the tracking shots. You can use the stabilization feature on Premiere Pro or FCP to enhance the video stabilization. Believe me, it will make a huge difference.
4. Create depth in your drone videos
Only filming huge rocks and lush forests won’t make your drone videos stand out. Try to combine close-up scenes, with medium and panoramic shots and include multiple camera angles for the foreground, midground, and background to highlight the composition and depth in your drone videos.
5. Cut to the beat
This is a hugely popular video editing strategy for action-packed drone videos. By placing the beat of the music or transition sound effect like whoosh to the video frame you want, so the video scene changes along with the music/SFX beats. It helps create emotions and dynamics for your drone videos. A trick is to place the music or sound effect 1-2 frames behind the video scene because we process visuals slower than the audio.
6. Change video speed to add rhythm to your drone videos
Just like how the change of music and sound effects will alter the vibes of your drone videos, so are the change in the video speed. For example, you can slow down the drone footage and add slow-motion sound effects to draw viewers’ attention to a specific subject/object while the drone flies fast toward a direction or speed up the drone footage when the drone flies towards or away from the subject.
Now, It's Your Move
So, that’s how you can edit your drone footage using DJI’s native FLY app and the versatile alternative FlexClip online video maker. Hopefully, this drone video editing tutorial can help you create epic drone videos. If you find this tutorial helpful, do share it with your friends on Facebook, or Twitter and leave your comments for us. Much appreciated.


FlexClip AI Video Maker
Reach professional-quality videos faster with easy editing tools, templates, and smart AI.
Start Now for Free
Hot & Trending
-

Best Ways to Find Music in YouTube Videos
-

Instagram Story Video Quality Bad After Upload? Fix It!
-

How to Repost Video on TikTok & How to Remove TikTok Repost
-

Improve Video Quality Online: 3 AI Video Quality Enhancers You Can't Miss
-

4K Convert to HD 1080p without Watermark: Best 4k Video Converters
-

Top 13 Birthday Video Makers with Music and Effects Free
-

How to Search Filters on TikTok & Use a Filter You See - TikTok Filter Guide
-

Large Collection of Creative and Funny Birthday Video Ideas for Ones You Care