Making a cinematic video with any camera is not a dream.
However, very often you may shoot some video footage, but it doesn’t look cinematic as what you’ve seen on the screen.
So, how could it happen?
In this post, we will walk you through 10 proven tips to make your video look more cinematic and offer actionable strategies even professional cinematographers use in both filming and editing movies. So, let’s dive into it, now!
Here is what you will learn:
What Makes a Cinematic Video?
The word “cinematic” is a general term, referring to any video or film produced with the features of quality motion pictures.
Though there are no definite rules to the making of it, many would agree that a cinematic-look video features unique storytelling (e.g. flashback, through characters, or chapters, etc.) and impresses viewers with thoughtful composition, delicate lighting, subtle color grading, engaging music and sound effects, thrilling camera movements like a long take, choreography, and other visual effects.
For beginners of videography and cinematography, we broke down the formula of a cinematic video into the following 10 actionable strategies for you.
How to Make a Cinematic Video in both Filming and Editing
1. Frame Your Shots to Create Depth
Placing the actors and props in the right place is essential to filming. It helps to direct the audience's attention and create visually-appealing images.
Use the rule of thirds, dividing the frame into trisection vertically and horizontally separately. It’s better to place the subject on the cross point to emphasize the subject or highlight your theme and make the frame feel more cinematic and comfortable.
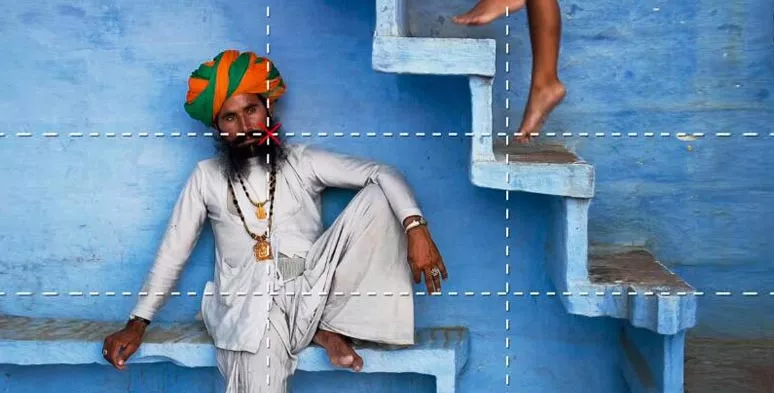
Use the role of thirds for cinematic video composition
Place your subject between the foreground and background to create depth and dimension for the cinematic vibes.
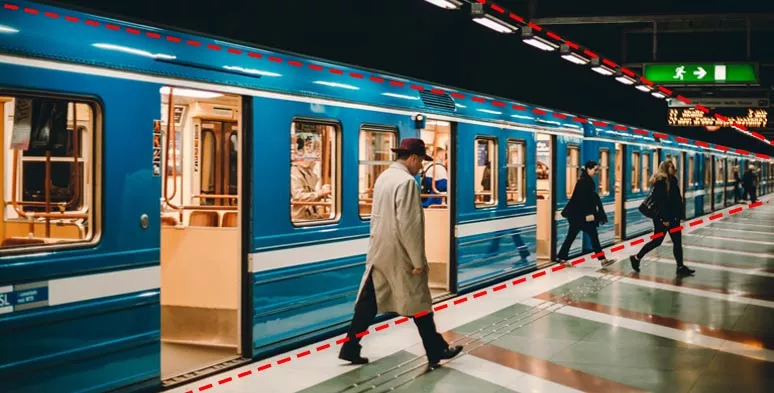
Use the leading line to create depth for a cinematic video
Any objects like tree branches, chairs, and crowds can be used as a foreground while using leading lines like pathways, long corridors, and winding stairs are great tools to create a sense of space to direct your viewers' attention. Check out the 10 best film composition techniques.
2. Create Shallow Depth of Field
The depth of field defines the visible area between the subject to the camera and to the background.

Shallow and deep depth of field (image source: photography course)
Shallow depth of field video enables you to create blurry backgrounds or dreamy bokeh and makes your subject pop up from the background. So, viewers can focus on your subject and your video looks more cinematic.

F 1.4 large aperture lens and blurry background it produces
There are 3 ways to create a shallow depth of field when filming:
Use depth of field in film
One thing to mention, though the shallow depth of field does help your subject stand out from the background, just don’t overuse it. Otherwise, you will lose too much background information, which is not good for storytelling.
3. Avoid Shaky Footage and Use Flexible Camera Movements
Filming stable footage is essential to making a cinematic video and sets your videos apart from the amateurs. To avoid shaky footage, you can mount your camera on a tripod or a camera dolly (wheeled cart) to pan or tilt the camera.
Handheld vs Gimbal footage
In actual filming, a flexible way to create the cinematic camera moment is using an affordable 3-Axis handheld gimbal stabilizer and moving closely forward to show the emotions on the subject's face or moving backward to introduce the setting of the story.
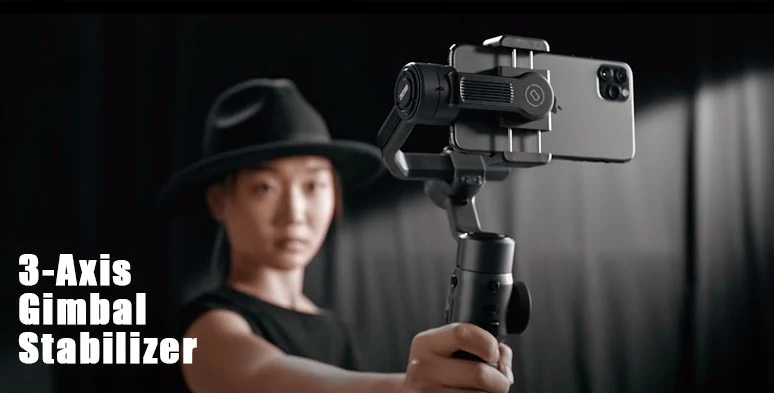
Use a 3-Axis gimbal stabilizer to film stable and cinematic footage.
Particularly in action films or scenes to portray the protagonist's inner feelings, using gimbals to move around the subject is the best option to create the cinematic vibes. Of course, you need to practice a lot.
However, if you are in a rush to meet the deadline or can’t afford a stabilizer, you can fix the visual vibration with the Warp Stabilizer in Adobe Premiere Pro. But, anything that can be fixed in real-time filming should not be left in the post-production.
Fix visual vibration with Adobe Premiere Pro
4. Properly Use Slow Motion
Slow-motion is widely used in motion pictures to enhance a dramatic moment like the falling of raindrops, or the movement of the bullet as you have seen in the movie “The Matrix”.
Bullet dodge scene in “The Matrix”
Slow-motion occurs when the filming frame rate exceeds its playback frame rate. For example, you film a video at 60FPS or 120 FPS and play it back at 24 FPS, which is a standard framerate for film production, the subject’s movement will become much slower. Or you can do it by filming a 60/120FPS video and converting it to 24FPS in Adobe Premiere Pro.
Another great alternative is to use the “Speed Curve” feature of FlexClip to smoothly slow down any parts of a video up to 0.1x slower to add rhythm to the video and make the scene transition more dramatic. Just upload your footage to FlexClip AI video maker online and adjust video speed to create cinematic video effects. Super easy.
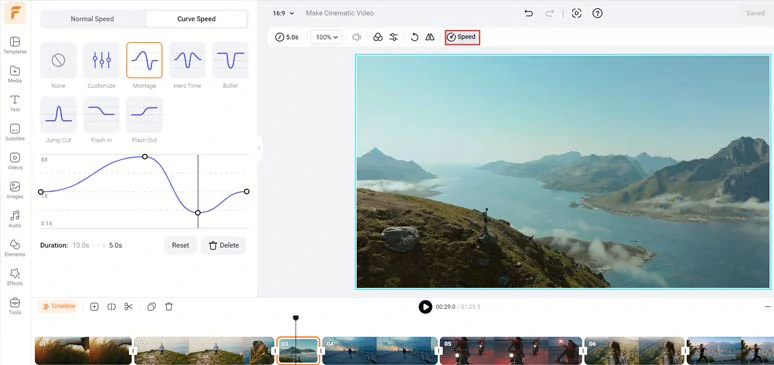
Use speed curves to slow down parts of the video to create cinematic video effects.

5. Use Cinematic Lighting Techniques
Apart from the aesthetic composition, a cinematic video also features dramatic lighting, another powerful way to create depth and shape a character's personality.
To have the cinematic lighting in your videos, you need to pay attention to 3 things:
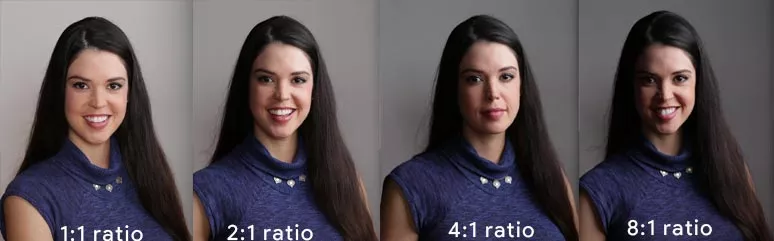
Maintain a high lighting contrast ratio for a cinematic video (Image source: Pixelsham)
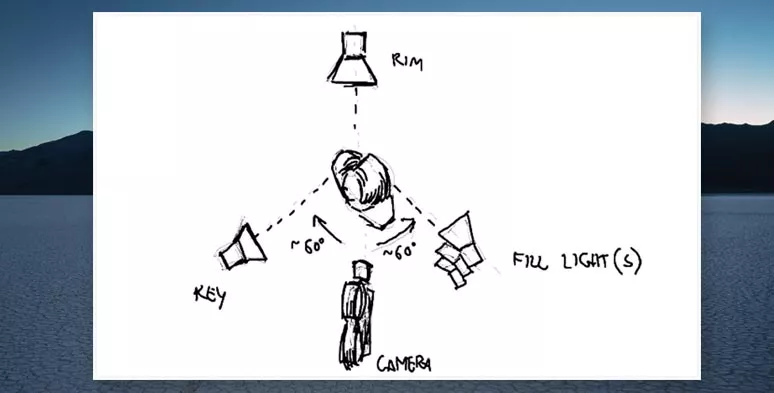
Class 3 lights setup: key light, fill light, and backlight(image source: StudioBinder)
You may use other decorative lights like small Christmas lights or lamps to create interesting layers and great background separation for the cinematic vibes. Since not everyone can afford high-end lighting kits, you can buy affordable Led lights on amazon to your needs.
For beginners, if you ended up with underexposed video footage, you may use FlexClip’s adjustment tool to brighten your videos. Follow the link to learn how to adjust video brightness.
Dark video footage recovered by FlexClip
6. Apply Color Grading
Color grading video footage is one of the most effective ways to add a touch of cinematic look to your movie and set the tone for the video footage.
Just as photographers refine the color tone of raw photos for retouching, you can adjust the hue, saturation, and luminance of your movie to get the desired contrast and fix the skin tone of actors and evoke special emotions.
The key for color grading is being subtle and natural, esp. for the skin tone of the subject. Don’t overdo it.
Here is the difference between unedited raw footage and the one with color-grading.
Before and after effect after color grading raw footage with FlexClip
An easy way to color grade your videos is using FlexClip AI video editor. Upload your video footage and press the "Adjustment" button, and fine-tune the color temperature, contrast, saturation, tint, shadow, and vignette, etc. to get the visual effects or atmosphere you prefer.

Color-grade raw footage to add the cinematic look to videos by FlexClip.
Or you can use Adobe Premiere Pro’s Lumetri tool to color grade your videos or upload a Lut (Look Up Table or a ready-made color-grading template) to apply it to your videos. Then, you can adjust the colors of the highlight, mid-tone, and shadow of your videos.
Another alternative is Premiere Pro’s “Adjustment Layer”. So you can apply the color-grading to the adjustment layer and put it over the video tracks to color-grade the video.
7. Use Cinematic Music and SFX
Adding cinematic music and sound effects is another key factor that defines a cinematic video.
In terms of cinematography, adding the proper cinematic music or sound effects to your film can effectively heighten the atmosphere and shape the character’s emotional response and add a rhythm to the scenes and storytelling, etc.
Check how big a difference the cinematic music and sound effects make in the same scene:
Use FlexClip’s royalty-free music and sound effects to add cinematic music and SFX.
That’s why Hollyhood movie directors spend a large sum of money, hiring composers or instrumental soloists and professional bands and foley artists to tailor-make the original movie soundtracks.
Luckily, today you don’t have to go bankrupt to have all this cinematic music and sound effects for your videos. With Flexclip’s 74,000+ royalty-free and studio-like music and sound effects, you can easily match your videos with multiple layers of cinematic audio. Besides, free high-res cinematic stock footage and photos are also available.
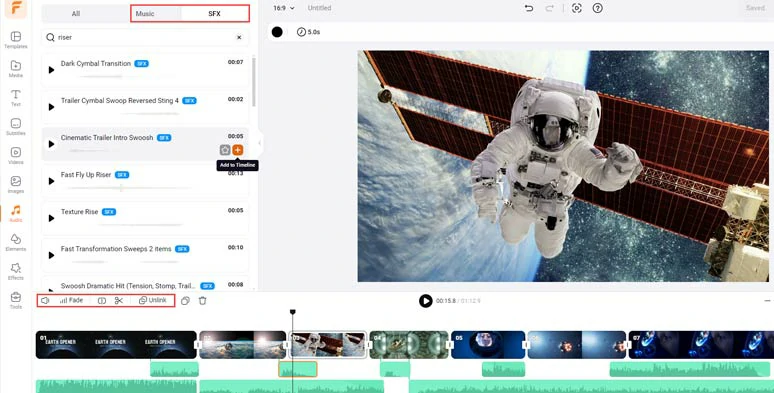
Add multiple layers of cinematic music and sound effects to the video for audio mixing.
Also, read the top 9 cinematic transition sound effects you should use for video editing.
8. Add Cinematic Fonts and Text Effects
Like color grading, using cinematic fonts is another way to add an extra cinematic touch to your videos. While which exact font you need depends on the theme of your movie, personal preference, and others.


Here are 13 cinematic fonts favored by Hollywood filmmakers:
A shortcut to boosting your workflow for adding cinematic captions/subtitles is using tons of fonts and designer-made cinematic titles like the “Lower Thirds”, “Profile”, “Quotes”, and “Search Bars”, “Call out Titles”, etc. in Flexclip. Or just upload your favorite fonts and Or just upload your favorite fonts and customize the style and text animations, such as such as glitter, typewriter effect, neon, blur, burst, etc.
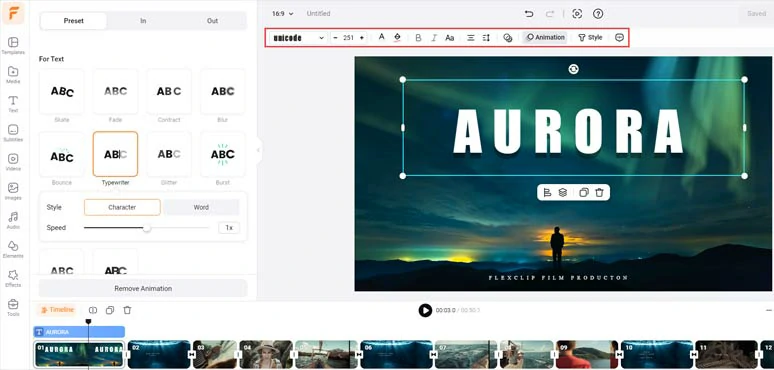
Add cinematic fonts, titles and text animations to your videos by FlexClip.
Here is the resulting cinematic video titles from the example above:
Make a video look more cinematic with cinematic titles and text effects.
9. Create the Cinematic Bar at the Top and the Bottom
Well, nowadays, not all films have a cinematic bar or the typical black bar on the top and bottom of the screen.
However, the interesting thing is by adding one, your video can immediately trick your audience into thinking that they are watching a movie with the cinematic format, which is the classic 21:9 wide-screen look.

If you can’t make it happen during the actual filming, the user-friendly Flexclip can help you do it with great ease. Just upload your clips to FlexClip > go to the Element tab > Shape > add two black bars into the video > finally animate the black bars with an upward/downward animation respectively. Boom! The cinematic black bar video opener is created.
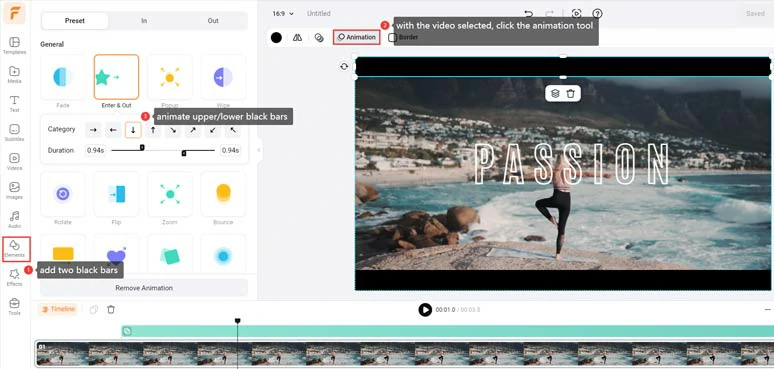
Create cinematic black bars for the opener of your video by FlexClip
10. Add Cinematic Look to Footage with Film Grain Overlays
Lastly, another trick to making a cinematic video is by imitating the texture and vibes captured by old film cameras. This method works well if your video project needs to add vintage film look textures like dust, scratches, and film grains seen in movies of the 60s and 90s.
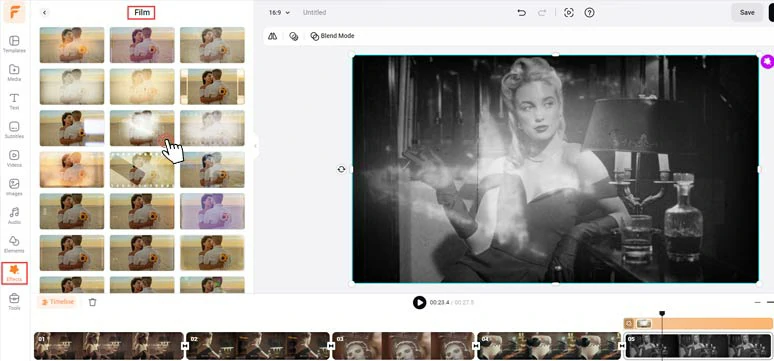
Add cinematic film grain overlays to create vintage cinematic video effects by FlexClip.
To do so, you may upload your clips to FlexClip AI video maker > add your clips to the timeline > add a vintage filter to color-grade the footage > click Elements tab > add a cinematic film grain overlay to add a cinematic look to your video. Easy peasy lemon squeezy!
So, let's compare how the video looks now after the film grain overlay was added:
How to make a cinematic video with film grain overlays by FlexClip.
Besides, cinematic effects overlays like fire, lightning, snow, dreamy bokeh, lens flare, light leaks, smoke, golden particles, vintage film rolls, bubbles, etc. are also available to create cinematic video effects. Please feel free to explore.

Now, It's Your Move
Making a cinematic video is more than having the right camera and lens. It involves lots of thoughtful planning and team efforts in both actual filming and editing. Hopefully, our top 10 proven strategies will unleash your creativity for making a great cinematic video. If you lack royalty-free video or audio assets and an easy-to-use tool, the FlexClip can your great helper. So, start planning your blockbuster now.


FlexClip AI Video Maker
Reach professional-quality videos faster with easy editing tools, templates, and smart AI.
Start Now for Free
Hot & Trending
-

Best Ways to Find Music in YouTube Videos
-

Instagram Story Video Quality Bad After Upload? Fix It!
-

How to Repost Video on TikTok & How to Remove TikTok Repost
-

Improve Video Quality Online: 3 AI Video Quality Enhancers You Can't Miss
-

4K Convert to HD 1080p without Watermark: Best 4k Video Converters
-

Top 13 Birthday Video Makers with Music and Effects Free
-

How to Search Filters on TikTok & Use a Filter You See - TikTok Filter Guide
-

Large Collection of Creative and Funny Birthday Video Ideas for Ones You Care