QuickTime Player gains a large amount of popularity among Mac users due to its cost-free and easy-to-use feature. It is widely used for recording different types of videos, including a meeting, video games, tutorials, live streaming, and more.
However, a common issue that the users face is that the screen recording has no sound. That's so annoying, especially when you use it to record a conference or live streaming. So, how can we address the QuickTime screen recording no sound issue? Follow the instructions below to fix the problem in minutes!
Solution 1: Check Mac's Security & Privacy settings
Sometimes, the screen recording no sound problem may be caused by inappropriate Mac's security & privacy settings. So, check if your Mac allows QuickTime Player to use the microphone. Here is the guide:
Click the Apple icon at the top-left of the screen > System Preferences > Security & Privacy > Privacy.
You will find QuickTime Player at the right of the microphone option. Check if the application is permitted to use the microphone. If QuickTime Player doesn't get permission, follow step 3.
Hit the lock icon > enter your password > click check box to allow QuickTime to use the microphone.
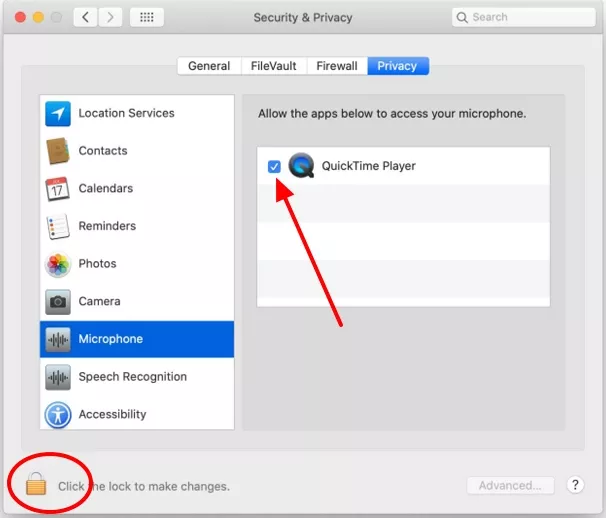
Image Board: QuickTime Screen Recording No Sound - Fix 1
Solution 2: Check the sound input settings
If you have already enabled QuickTime Player to access the microphone, but there is still no audio. Maybe there is something wrong with the sound input settings that you may turn off the input volume. To fix this, follow the guide below.
Hit the Apple logo > System Preferences > Sound > Input.
Select Mac Book Air Microphone. Then, you will find the input volume option at the bottom of the window.
Check if the volume is turned on. If not, turn up the volume to ensure that your Mac is capable of catching the input sound.
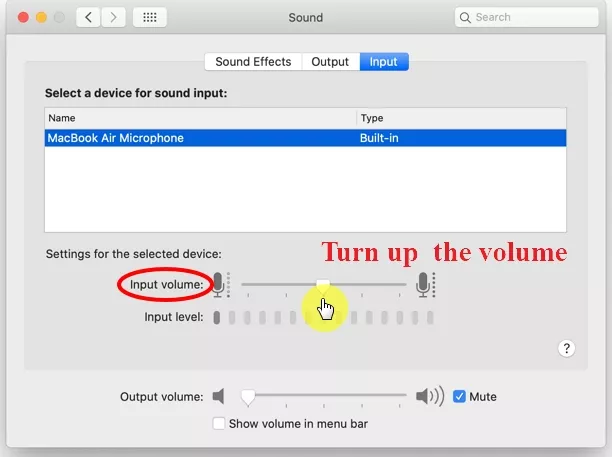
Image Board: QuickTime Screen Recording No Sound - Fix 2
Solution 3: Download a third-party audio recorder - Soundflower
If both of the solutions mentioned above don't work for you, you can try a third-party application to fix the screen recording no audio problem. Let's see how to capture the screen with audio using QuickTime Player and Soundflower.
If the Soundflower doesn't get permission from Mac, you can go to System Preferences to modify the settings.
Click the Apple logo > System Preferences > General > hit lock icon > enter password > select Apple Store and identified developers.
Click "+" at the bottom-left of the window > Create Aggregate Device > select Built-in microphone and Soundflower(2h).
Click "+" again > Create Multi-output Device > select Built-in microphone and Soundflower(2h).
On the Output tab, select screen record w/ audio. And on the Input tab, choose QuickTime Player.
Select New Screen Recording and click the arrow button at the right of the play button. You will see a drop-down menu.
You can select "QuickTime" to capture the screen with both internal audio and microphone. If you need the internal audio solely, choose Soundflower (2h).
How To Screen Record With Audio on Mac
Solution 4: Switch to a QuickTime Alternative
For beginners, Solution 3 may be a little bit complicated. If you don't want to download any third-party application, you can also try a QuickTime alternative. FlexClip screen recorder is one of the best online tools that can help you capture the screen with audio. With Flexclip, you are able to capture the screen with internal audio or microphone input.
Whether you want to record a webinar, online course, or How-to video, this excellent tool can help you out. Additionally, you don't have to download it or register for an account. Here are some reasons why people prefer to use it.
The intuitive interface makes it easy for you to record the screen. With this tool, you can capture whatever you want, such as the full screen, window application, Chrome tab, just with a few clicks.
After you finish the recording, you can use its versatile editing tools to level up your video. For instance, you can trim and crop the video, change the video speed, modify the aspect ratio, and more. To make your video more attractive, you can add transitions, stickers, and text animations to your video.
Three export video resolution are available - 480p, 720p, 1080p. When you're done, you are capable of exporting the video without quality loss.
How to use FlexClip's screen recorder? Here is the guide:
Navigate to "Tools" > Screen Recorder
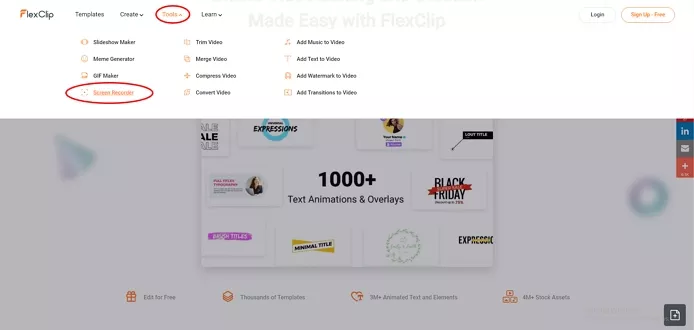
Image Board: How to use FlexClip's screen recorder - Step 1
Click "Start Recording." You will find three audio options - Microphone, System Audio, No Audio. Choose the one you need and hit the red button.

Image Board: How to use FlexClip's screen recorder - Step 2
Select the screen you want to share and click "Share audio." Then, hit "Share."
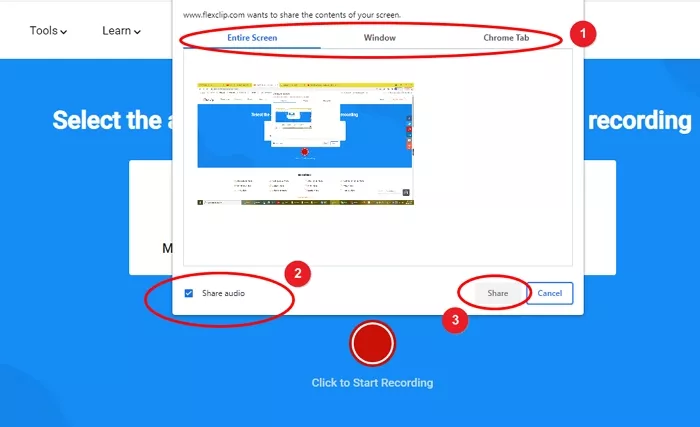
Image Board: How to use FlexClip's screen recorder - Step 3
Click the "Stop" button at the bottom of the screen. If you choose the record chrome tab, the "Stop" button will appear at the top left of the screen.
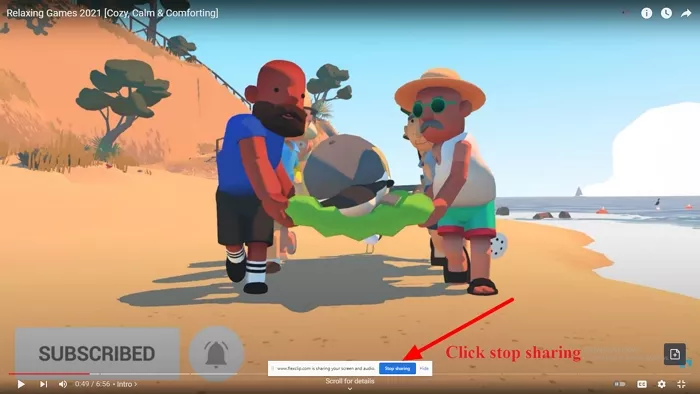
Image Board: How to use FlexClip's screen recorder - Step 4
After you stop sharing the screen, go back to FlexClip and click "Download and Edit in MP4." Or you can solely download it.
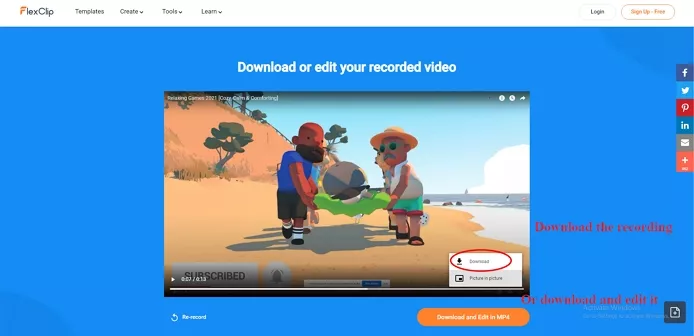
Image Board: How to use FlexClip's screen recorder - Step 5
Bottom line
Hopefully, this tutorial does help you settle the QuickTime screen recording no sound issue. If you want to level up the captured video with text animations, stickers, and more, try FlexClip's screen recorder for free!


FlexClip AI Video Maker
Reach professional-quality videos faster with easy editing tools, templates, and smart AI.
Start Now for Free
Hot & Trending
-

Best Ways to Find Music in YouTube Videos
-

Instagram Story Video Quality Bad After Upload? Fix It!
-

How to Repost Video on TikTok & How to Remove TikTok Repost
-

Improve Video Quality Online: 3 AI Video Quality Enhancers You Can't Miss
-

4K Convert to HD 1080p without Watermark: Best 4k Video Converters
-

Top 13 Birthday Video Makers with Music and Effects Free
-

How to Search Filters on TikTok & Use a Filter You See - TikTok Filter Guide
-

Large Collection of Creative and Funny Birthday Video Ideas for Ones You Care