Slow-motion video can be beautiful, only when executed correctly with Adobe Premiere. As one of the best mainstream video editors, it is equipped with professional video editing tools. However, newbies many get confused about its complicated interface and terms like frame rate are huge headaches.
Here in this post, we will take a look how to slow down a clip in Premiere pro. If you want to create a slow-motion, it also works. Check it out. In case you find Adobe Premiere pro is hard to operate, we found an easier-to-operate tool to help you slow down a video for you. Refer to the part you need.
Also Read: 8 Best Video Background Music Resources >
Part 1. How to Slow Down a Video in Premiere
Note Most cameras shoot 720p or even 1080p videos at 60 fps(frames per second). To slow down a video in Premiere, the video has to be in 60fps and above.
You can use three methods to slow down a video in Premiere. They are changing the play speed, changing the frame rate or changing key frames respectively.
Method 1. Slow Down a Video in Premiere Pro by Changing Play Speed
Here is an example to understand the speed mechanism. Image there is a one-second clip at 60fps. When it is played at normal speed, any software or platform will show you 60 frames in one second. If you want to make a video play 0.5X slower, then, each frame will be played twice. As a result, you only see 30 un-repeated frames in second, and you need 2 seconds to finish the clip. No quality loss would occur.
To slow down a video in Premiere by changing speed, you will need to find the Speed/Duration option.
Step 1 Launch Premiere and drag your video file into your premiere project and then drag it to the Timeline.
Step 2 Right click the video footage, then tap Speed/Duration option.
Step 3 Change the speed percentage to less than 100%.
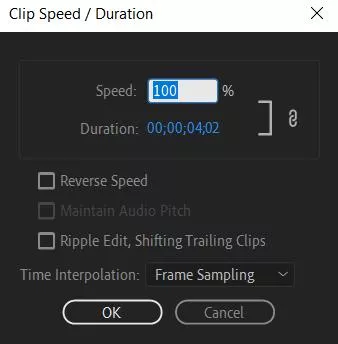
Image Board: Slow Down a Video in Premiere Pro by Changing Video Speed
Method 2. Slow Down a Video in Premiere Pro by Changing the Frame
As mentioned above, slowing down a video by changing play speed means skipping or repeating some clips. Slowing down a video by changing the frame means removing some frames from the video. But don’t worry, the video quality will remain the same. Here is how to slow down a video in Premiere pro by changing the frame.
Step 1 Drag your video to the timeline. Right click the mouse, select Modify > Interpret Footage.
Step 2 Change the frame information. Click on Assume this frame rate, enter a smaller number than your original video frame rate.
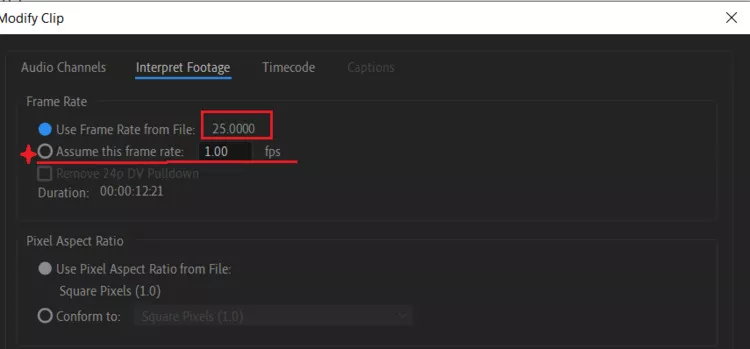
Image Board: Slow Down a Video in Premiere Pro by Changing Frame
Method 3. Slow Down a Video in Premiere Pro with Remapping Tool
Remapping tool is one of the coolest tool to create a slow-mo. It allows you to select a specific part of a video and then slow down.
Step 1 Select the exact zone you want to speed up.
Step 2 Right click the video clip, and show the “Key Frames” >”Speed”.
Step 3 Lock the area you want to speed up by ‘Pen Tool’( ), and drag the ‘Speed Line’ by ‘Selection tool’(
 ), down to slow the video.
Part 2. An Easier Way to Slow Down a Video than Using Premiere
Find it too complicated to use Premiere to slow down a video? Try FlexClip. As an online video editing tool, it allows you slow down a video online in just clicks whether you need to slow down a whole video, or slow down part of a video. Easy, efficient, and free. Besides that, FlexClip allows you to export videos in 480p, 720p, and 1080p. No video quality loss would occur. Moreover, it also provides you many easy-to-use editing tools that level up your work, like transition effects, filters.
Now, follow us, visit www.flexclip.com, or click on the Create A Video button below to slow down a video.
Step 1Click on the “+” icon, choose From Local File to export your video to FlexClip’s storyboard.
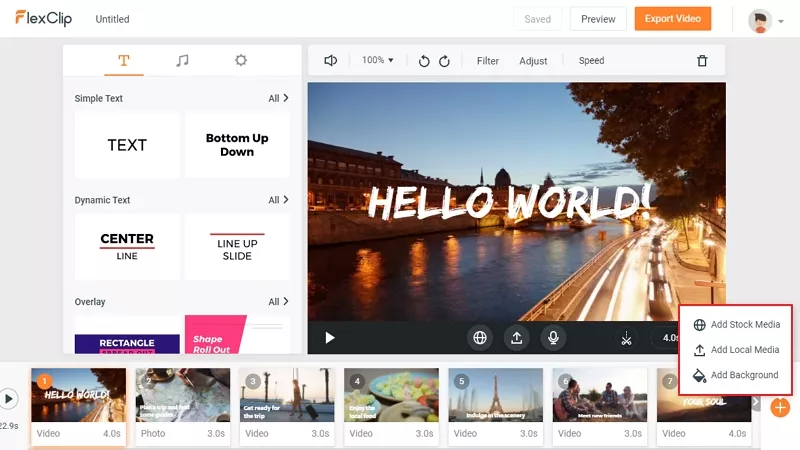
Image Board: Slow Down a Video with FlexClip - Step 1
Step 2Go to the Speed icon as is shown. Choose 0.75X or 0.5X.
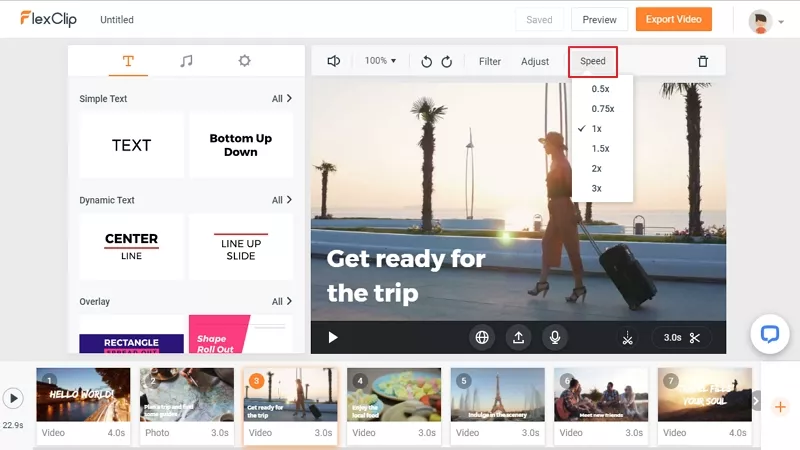
Image Board: Slow Down a Video with FlexClip - Step 2
Step 3(Optional) Add filters, transitions, texts, BGM, voice-over or watermark to level up the video at your wish.
Step 4Preview and export. If you are satisfied with the editing, download it to your computer or share to YouTube.
The Bottom Line
That’s all for how to slow down a video on Premiere Pro. If you have any questions, please do let us know via Facebook. By the way, FlexClip is also a great tool to slow down videos. It also helps you create all sorts of videos, for example, lyric video, Tik Tok video, Facebook video. Remember to give it a try!


FlexClip AI Video Maker
Reach professional-quality videos faster with easy editing tools, templates, and smart AI.
Start Now for Free
Hot & Trending
-

Best Ways to Find Music in YouTube Videos
-

Instagram Story Video Quality Bad After Upload? Fix It!
-

How to Repost Video on TikTok & How to Remove TikTok Repost
-

Improve Video Quality Online: 3 AI Video Quality Enhancers You Can't Miss
-

4K Convert to HD 1080p without Watermark: Best 4k Video Converters
-

Top 13 Birthday Video Makers with Music and Effects Free
-

How to Search Filters on TikTok & Use a Filter You See - TikTok Filter Guide
-

Large Collection of Creative and Funny Birthday Video Ideas for Ones You Care