How to Screen Record on Windows 11 in 4 Great Ways

Last Updated: 2022. 06. 29

Just upgrade your system to Windows 11 and now looking for great screen recorders to record screens with audio on Windows 11? We’ve got you covered. In this post, we will walk you through 4 great options to screen record on Windows 11.

So, whether you want to record your gameplay or capture both screen and your face with audio for tutorial videos, or even report a bug to colleagues, you can easily create the screencasts with ease.

Here’s what you’ll learn:

Here is a quick takeaway for screen recording on Windows 11:

  • The pre-installed Xbox Game Bar on Windows 10 continues to be available on Windows 11 for free screen recording. The update is that you can have more customizations to recording on Windows 11’s control panel.
  • Other than the Xbox game bar, you may also Microsoft PowerPoint, or a third-party app to screen record on Windows 11 with sound.
  • To record quality video and audio for the screen recording, an external webcam and microphone are preferred.
  • How to Screen Record on Windows 11 by Xbox Game Bar

    Xbox Game Bar was originally designed to help gamers to share recorded gameplay videos and live chats. Yet, surprisingly it offers a free workaround to record screens with audio on Windows. Evolving from Windows 10 model, Xbox Game Bar on Windows 11 continues to serve as a free and handy screen recorder for gamers, etc.

    Use the built-in Xbox Game Bar to screen record on Windows 11 for free

    Use the built-in Xbox Game Bar to screen record on Windows 11 for free.

    Step 1
    Use the keyboard shortcut Win + G to launch the Xbox Game Bar screen recorder.
    Step 2
    Start screen recording: Click the Capture icon > click the Record button. Then XBOX Game Bar will automatically screen record your full screen on Windows 11.
    Click on Xbox Game Bar’s record button

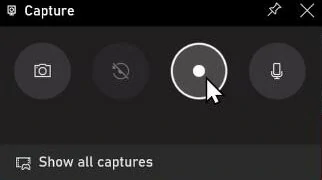
    Click on Xbox Game Bar’s record button.

    Step 3
    Stop screen recording and view video recordings: Click the Stop recording button > click Game Clips recorded to view the recorded video files.
    Bonus: How to screen record on Windows 11 with audio
    Hover over the Xbox Game Bar’s menu > click the settings icon > click Capturing to decide whether you record only the gameplay audio or game+mic or disable all audio recordings. You may also click ShortCuts to customize the keyboard shortcuts for “Start/Stop Recording”, Microphone on/off, etc.
    Customize the audio capture settings

    Customize the audio capture settings.

    Or you can open Windows 11’s control panel > select Gaming > Captures > then you can customize the following settings:

    Setup more screen recording preferences in Windows 11’s control panel

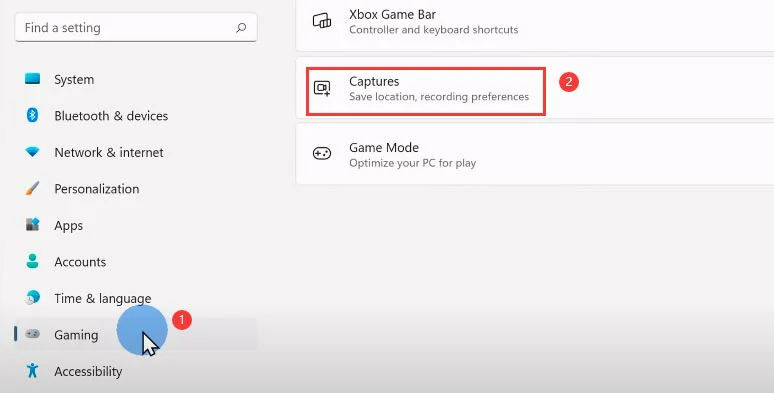
    Setup more screen recording preferences in Windows 11’s control panel.

  • The max recording length (30mins-4hrs).
  • Audio quality of the microphone and system sound.
  • Video frame rate (30/60FPS).
  • Video quality (standard, high).
  • Show or not show the capture mouse cursor when recording a game.
  • Though Xbox Game Bar offers you a free and easy way to screen record on Windows 11 with audio, there are some obvious drawbacks:

  • Can’t record your desktop and file explorer.
  • Can’t click and drag a selected area on your screen for recording.
  • Can’t record both your screen and your webcam.
  • No way to edit video recordings.
  • How to Screen Record on Windows 11 by FlexClip Online

    If you are a content creator who often needs to record a video tutorial with your face and voiceovers on and later edit all the elements into a compelling YouTube video, then using FlexClip online video maker can be your one-stop solution to screen record on Windows 11. No software download and experience are needed.

    Use FlexClip online screen recorder to screen record on Windows 11 and make edits

    Use FlexClip online screen recorder to screen record on Windows 11 and make edits

    Create Now

    With FlexClip screen recorder and video editor, you can:

  • Record the entire screen on the desktop or a specific window/chrome tab with/without a webcam on.
  • Decide to record microphone + system audio, mic/system audio-only, or without audio.
  • Instantly edit recordings within the feature-rich online video editor, such as adding animated texts, dynamic annotations, customizable YouTube intro/outro templates, royalty-free music/sound effects, video transitions, filters, or changing video speed, add more of your video assets for edits.
  • Gaming Reviews
    Preview
    Gaming Reviews
    Use This Template
    Youtube Cute Gaming Channel
    Preview
    Youtube Cute Gaming Channel
    Use This Template
    Tech Youtube Intro
    Preview
    Tech Youtube Intro
    Use This Template
    Video Tutorial Service
    Preview
    Video Tutorial Service
    Use This Template
    Step 1
    Access FlexClip video maker and click the Media tab and press the Recording button.
    Access FlexClip and click the recording button

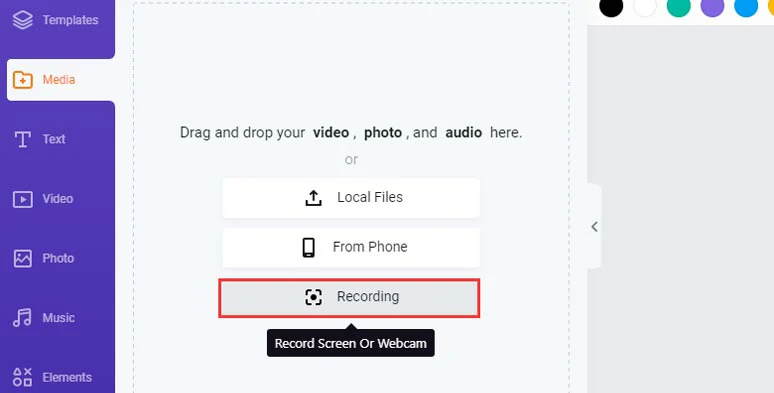
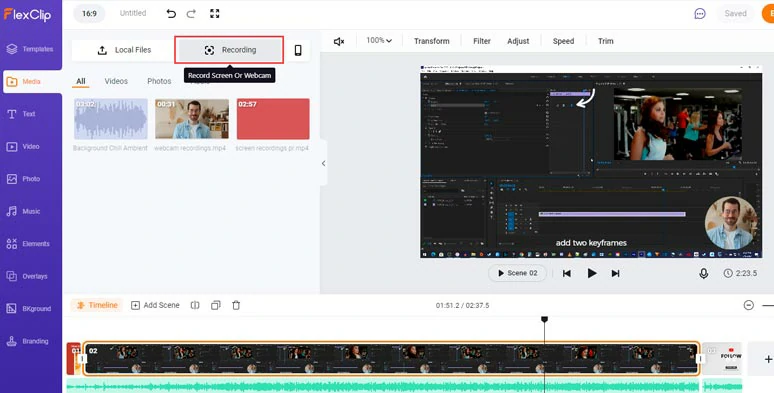
    Access FlexClip and click the recording button.

    Step 2
    Set video and audio recording: You can choose to record screen+webcam or screen/webcam individually with/without mic and system audio and customize the recording webcam and mic.
    Set video and audio recording preferences and recording devices

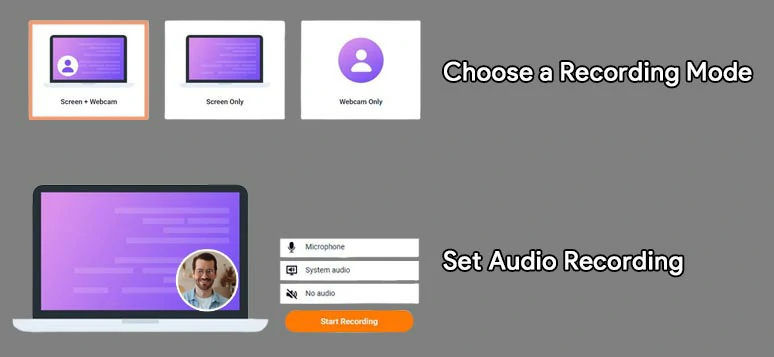
    Set video and audio recording preferences and recording devices.

    Step 3
    Locate the recording area: choose from your entire screen, a specific window, or a chrome tab. Then, check “Share System Audio“ and click Share. Then, the screen recording shall automatically begin.
    Select the entire screen, a window or a chrome tab for screen recording

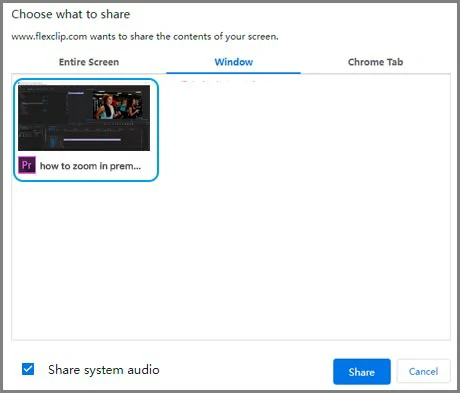
    Select the entire screen, a window or a chrome tab for screen recording.

    Step 4
    Stop recording and add video recording to the media library: Click Stop Sharing to stop the recording > head back to FlexClip. Now you can preview the recording > click Add to Library. Then the screencasts of your screen and webcam will be imported to the FlexClip video editor separately.
    Import the screen recordings to the FlexClip video editor for edits

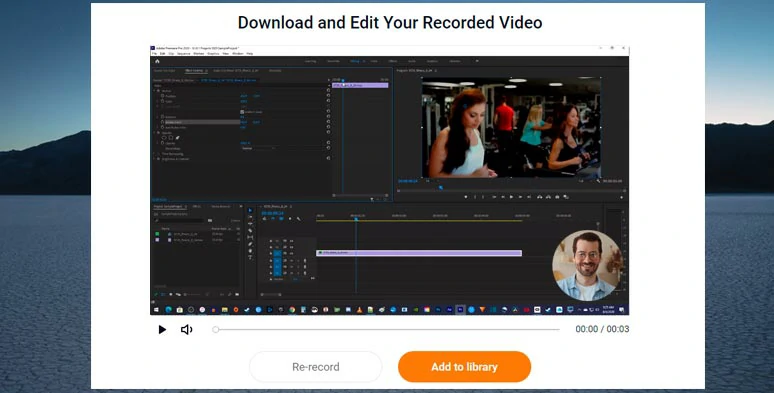
    Import the screen recordings to the FlexClip video editor for edits.

    Step 5
    Edit video recording: You can add screen recording to the timeline > click picture-in-picture to add webcam into the screen recording > you can reposition the webcam recording or use crop mask to refine its shape. Then add animated texts, free music/SFX, or find animated arrows, illustrations, emojis, add video transitions, etc. to spice up your video.
    Add animated texts, dynamic annotations, free music, etc. to the screen recordings

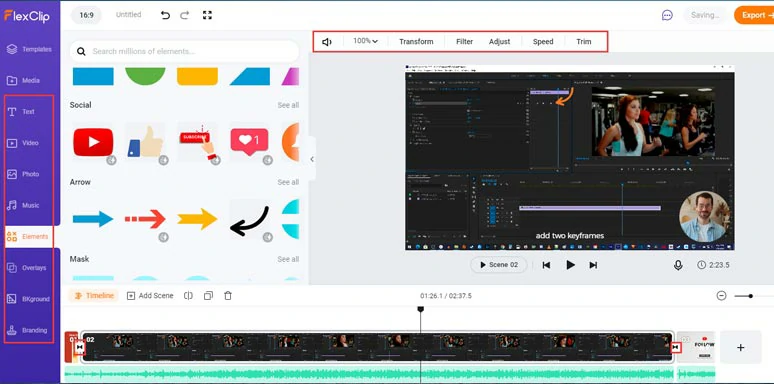
    Add animated texts, dynamic annotations, free music, etc. to the screen recordings.

    Create Now
    Step 6
    Preview and share: Done with the editing, you can directly download the video to your hard drive or share it to YouTube, Google Drive, or Dropbox. Besides, a clickable link and embed code are also available for your blog or repurposing.

    Well, there are a couple of imperfections as we tested FlexClip for screen recording:

  • Max recording length is 30 mins.
  • If you record both screen and webcam, later you have to manually add two separate recordings to the timeline to merge them.
  • Can’t directly drag and drag to select an area on the desktop for screen recording.
  • How to Screen Record on Windows 11 by PowerPoint

    To your surprise, if you’ve already installed Microsoft PowerPoint on Windows 11, you can use it to screen record on Windows 11 and directly save the video recordings as an MP4 video.

    Screen record on Windows 11 by PowerPoint

    Screen record on Windows 11 by PowerPoint.

    Step 1
    Launch your PowerPoint on Windows 11.
    Step 2
    Record the screen: Click the Record tab > click the Screen Recording option > on the screen recording interface, you can click Select Area to click and drag an area for the screen recording or directly click Record to record the entire screen. You may also turn on/off audio and cursor while recording the screen.
    Step 3
    Stop screen recording and view recorded videos: Press the Stop button (shortcut: Win+Shift+Q) to stop recording > the video recording will be automatically inserted into the slide > you can select the video and click the Playback tab atop > then you can trim video, add fade-in/out effect, adjust the volume or insert captions, etc.
    Step 4
    Export the video recording: Right-click the video on the slide > select Save Media as… to directly save the video as an MP4 on your hard drive.

    The downside of using PowerPoint to record screen on Windows 11:

  • Limited features to edit the video recordings.
  • Can’t record both screen and webcam on the desktop or webpage.
  • Limited audio recording options.
  • How to Screen Record on Windows 11 by Zoom Meetings

    If you happen to be a Zoom Meetings user for business meetings, you may also give it a go using the Zoom Meeting app to screen record on Windows 11. It’s free and easy to handle. Also, read how to edit Zoom recordings.

    Use Zoom to screen record on Windows 11 for free

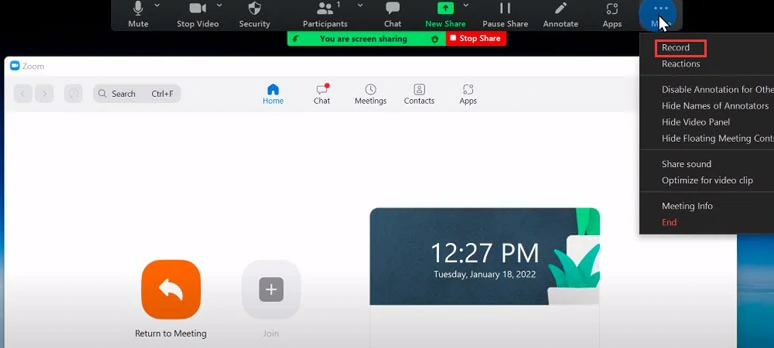
    Use Zoom to screen record on Windows 11 for free.

    Step 1
    Log into your Zoom desktop app.
    Step 2
    Click New Meeting > press Share Screen > you can select to record your window tab, desktop, whiteboard or even iPhone/iPad and virtual PowerPoint presentation. > select your desktop for screen recording > on the taskbar, click More, and select Record (ALT+R). You can use the annotation tool to draw lines, a feature not many free screen recorders have.
    Step 3
    Use hotkeys ALT+R to stop recording.
    Step 4
    View recorded videos: Click Meetings > Recorded > Open > find recorded MP4 screen recordings along with audio (M4A).

    Well, there is a downside of using Zoom to record screens on Windows 11, and that will be:

  • No tools to edit recordings the right way.
  • Now, It’s Your Move

      Platform Best Features Downsides
    Xbox Game Bar Desktop/Win Free; pre-installed on Win 11; record screen and audio; user-friendly for gamers and live chats; up to 4hrs of recording Can’t record a specific area/desktop/file explorer; can’t record screen+webcam
    FlexClip Online Free; record screen+webcam/screen or webcam individually with mic/ system audio; feature-packed video editor to edit recordings instantly; tons of custom video templates and 3M+ free video assets: video, image, music Max 30-min recording length; can’t click and drag to record a specific area on the screen
    PowerPoint Desktop Record the entire screen or a selected area Limited options for video edits, and audio recording; no way to record screen+webcam
    Zoom Desktop/Online Free; real-time annotation for screen recording; record screen+webcam; record virtual presentations; tons of customization options No video editing tools

    So, which option do you find most appealing for screen recording on Windows 11? Please feel free to experiment with the screen recorders above and share this post with friends on Facebook, and Twitter, and leave your comments for us. Looking forward to seeing your views.

    Group 11
    Make a free video online
    Create Your First Video With FlexClip Now
    Get Started - Free