Want to record your computer screen? Maybe you're going to record your screen for a presentation at work, share fun gameplay with your friends, or generate a tutorial video. Both the Windows and macOS, and even Chrome OS allow you to record your screen, but the methods for getting it done vary among different operating systems.
Here in this post, we'll show you how to record your screen, whether you're working with a Mac, a Windows PC, and a Chromebook.
Contents:
Free Editable Templates for Your Next Video Inspiration


Create Video Faster with FlexClip’s Pre-Made Templates →
Start from Scratch Easily with FlexClip’s Online Video Maker →
Can't Miss: 5 Best Game Recording Software>
Part 1 Online Screen Recorder for Windows, Mac & Chrome OS
To help you record your computer screen across systems, we highly recommend you to use on online screen recorder, like FlexClip, which allows you to capture the screen on a Mac, a Windows PC, and even a Chromebook without download or install any software.
It is super easy to capture your screen with FlexClip screen recorder, only taking a few clicks. FlexClip's online screen recorder is totally free for all users, and you can capture the computer screen and save it to a video without watermark. What's more, besides recording, it also provides you powerful tools for you to edit the captured video. You can easily trim & split, change speed, add transitions & filters, add subtitles, annotations, highlights, and overlays to level up your video content etc.
Here's how to record your screen using FlexClip online screen recorder:

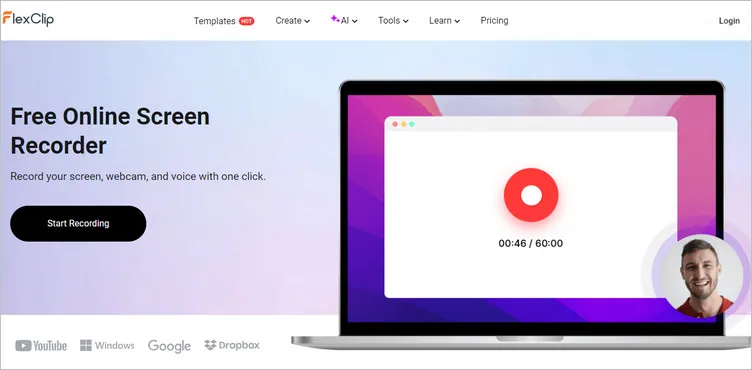
Image Board: Record Computer Screen Online with FlexClip - Step 1
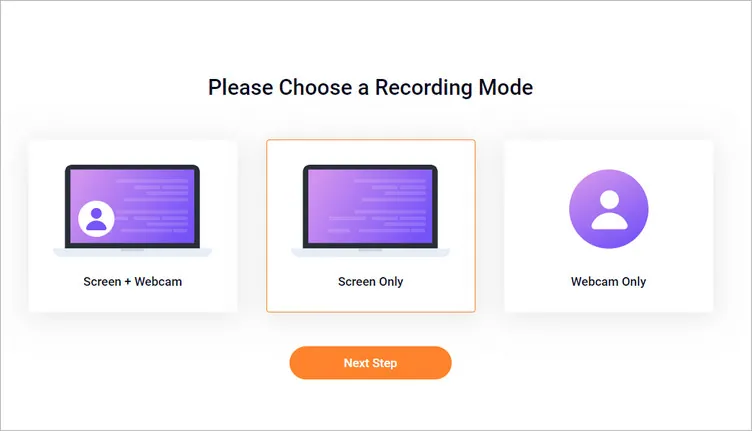
Image Board: Record Computer Screen Online with FlexClip - Step 2
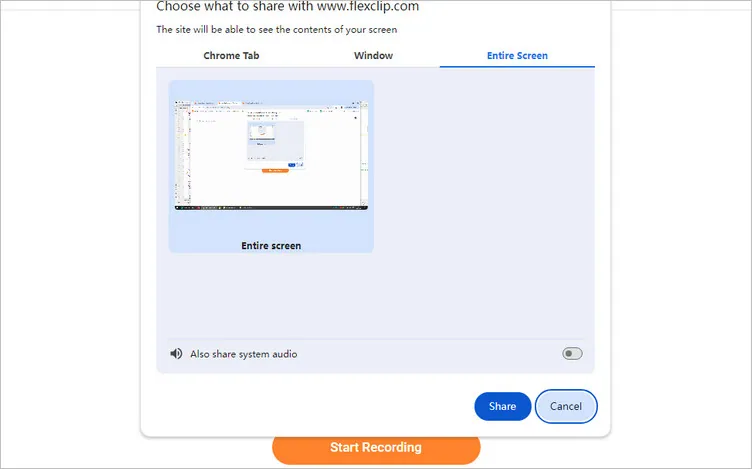
Image Board: Record Computer Screen Online with FlexClip - Step 3
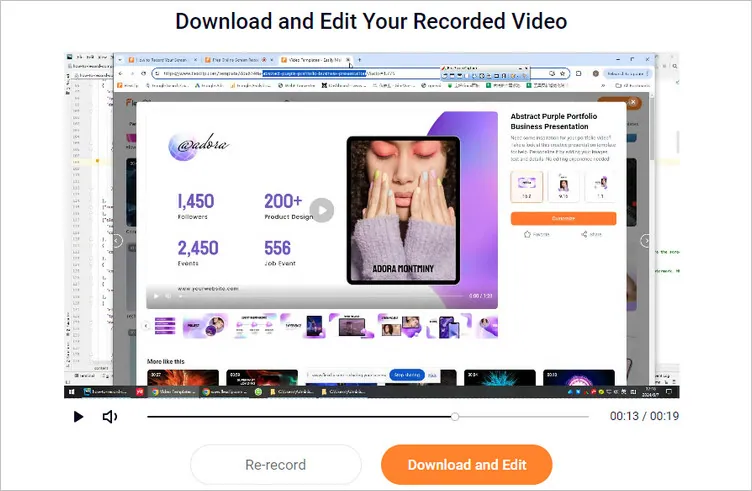
Image Board: Edit Your Recording with FlexClip
Part 2 How to Record Computer Screen on Windows
Need to record your screen on Windows 10? It is pretty easy to do as Windows 10 has a native video capture tool called Xbox Game Bar, which is primarily designed for gamers, but it also offers a convenient way to record your screen activity from other applications.
Follow the simple steps below to learn how to record your screen on Windows 10 (it will also all work on Windows 11).
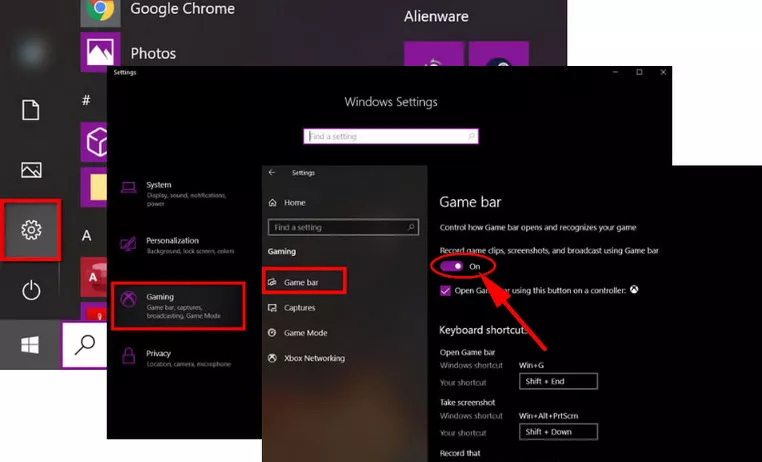
Image Board: Record Computer Screen on Windows 10
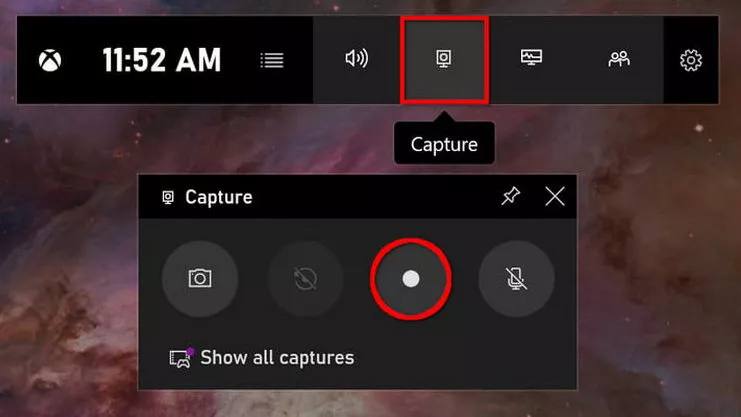
Image Board: Record Computer Screen on Windows 10
Part 3 How to Record Your Screen on Mac
Want to record your screen on a Mac? Luckily, Macs have this feature built in, allowing you to record part or all of your screen. Here we'll share two ways for you to record your screen on your Mac:
Use the Capture Tool to Record Screen on Mac
If you're using macOS Mojave or later, you can record your screen use the Command + Shift + 5 to start your recording. Below are the detailed steps:

Image Board: Record Computer Screen on Mac
Use QuickTime Player to Record Screen on Mac
For the users who work with macOS Mojave or earlier, QuickTime Player is a great option to record the computer screen. Follow the simple steps below to record your computer screen using QuickTime.
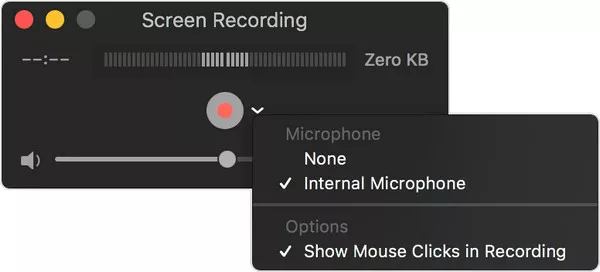
Image Board: Record Computer Screen on Mac Using QuickTime Player
Part 4 How to Record Your Screen on Chromebook
In 2021, Google added the built-in screen record feature for Chromebooks, which makes it easy to create screen recordings with no extra software required on your Chromebook.
There are two ways you can use to record your screen on a Chromebook: a keyboard shortcut or the Screen Capture tool.
Use Keyboard Shortcut to Record Your Screen on Chrome OS
Us Screen Capture Tool to Record Your Screen on Chrome OS
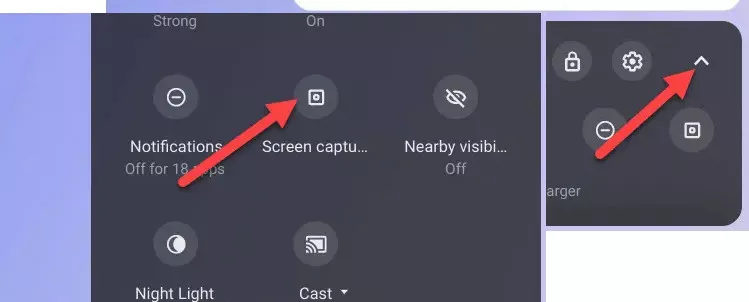
Image Board: Record Computer Screen on Chrome OS
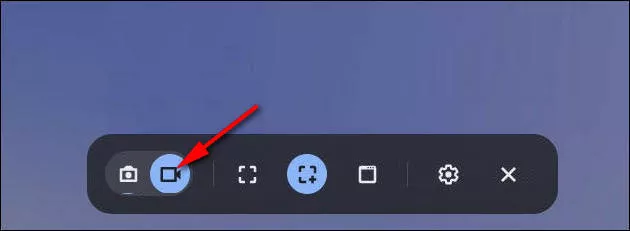
Image Board: Record Computer Screen on Chrome OS
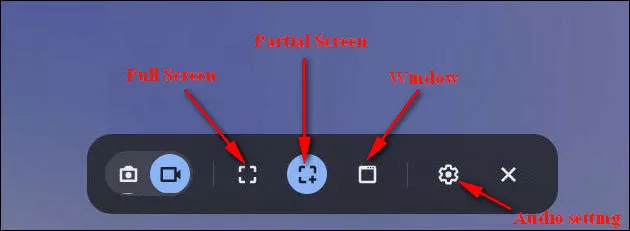
Image Board: Record Computer Screen on Chrome OS
Final Words
That's all about how to record your computer screen on Windows, Mac and Chrome OS. Hopefully, with the methods and online computer screen recorder we introduced above, you can capture your screen on computer easily.


FlexClip AI Video Maker
Reach professional-quality videos faster with easy editing tools, templates, and smart AI.
Start Now for Free
Hot & Trending
-

Best Ways to Find Music in YouTube Videos
-

Instagram Story Video Quality Bad After Upload? Fix It!
-

How to Repost Video on TikTok & How to Remove TikTok Repost
-

Improve Video Quality Online: 3 AI Video Quality Enhancers You Can't Miss
-

4K Convert to HD 1080p without Watermark: Best 4k Video Converters
-

Top 13 Birthday Video Makers with Music and Effects Free
-

How to Search Filters on TikTok & Use a Filter You See - TikTok Filter Guide
-

Large Collection of Creative and Funny Birthday Video Ideas for Ones You Care