Adding texts to video is a method that has been with us for some years now. We cannot exactly say that it is a new invention in the media industry, but the impact is grossing. Both advertisers and YouTubers are taking advantage of this creative invention, for some obvious reasons. Not just in the media and advertising, it can also be useful in the field of education, engineering, medicals, etc. Its purpose in these industries is usually the same: to convey information. Below, we have listed a few more importance of adding these moving texts to the video.
Why You Will Need Moving Texts to Video
Scientifically, visual information is easier for the brain to capture when it is blended with a bit of textual content, it becomes even easier for the mind to comprehend. And when you are familiar with the content of a particular video, it will be easier to recall unlike if it is 100% textual or visual. And for those who are preparing for a presentation, using moving text video content increases the rate at which you recall that information, thus, making you come out more confident.
Moving texts in a video help in picking out the main points in a video. You will understand that not every content in a video is worth consuming, so with the presence of a moving text, you will be able to get the gist of the video. Let’s cite an example, when you are making a video about how to make an Apple Pie, and you wish to list the ingredients, you must have mentioned a few verbs and pronouns before mentioning the main items, e.g. “….flour, Apple Cider, Water…” In the video, only those items for the preparation of Apple Pie mentioned will automatically appear as a moving text, that way, you will be able to pick the points easier.
This means that it can still pass its message with a sound. A study by Typito claims that 85% of videos on Facebook are viewed mute. This is very useful for those people who watch videos in public, listening to sounds could be very uncomfortable in such a situation. This is where the use of a moving text should be introduced for easy, convenient assimilation.
We will be listing some working methods you can follow to add moving text to your videos. But note that this procedure differs according to the tool you use, let’s try the three ways to add a moving text to your video, and pick the one that best works for you.
Method 1: Add Moving Texts to YouTube Video
Before we proceed, we wish to introduce one of the world’s most used and best text-adding video tools you can ever come across online: FlexClip. FlexClip is designed specifically for media people who wish to highlight key actions, create an easy-to-recall video, and create multi-phased video content. It comes with loads of dynamic text samples, and animations waiting to be explored. This is coupled with the rich fonts that fit all types of videos, and no download needed.
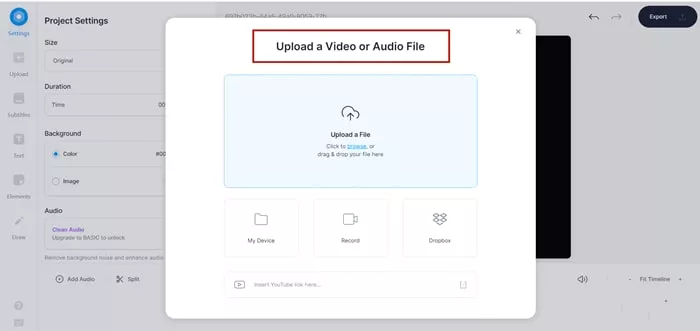
Open the FlexClip video editor and click ‘Local Files' to add the video to the FlexClip media library. Click the ‘Plus’ button to transfer it to the storyboard where it will be edited.


Select a fitting ‘Dynamic Texts’ or ‘Basic Texts’ to add to the video. Click the text located on the left side of the toolbar. Right-click on a dynamic text or Basic text you wish to add to your video.
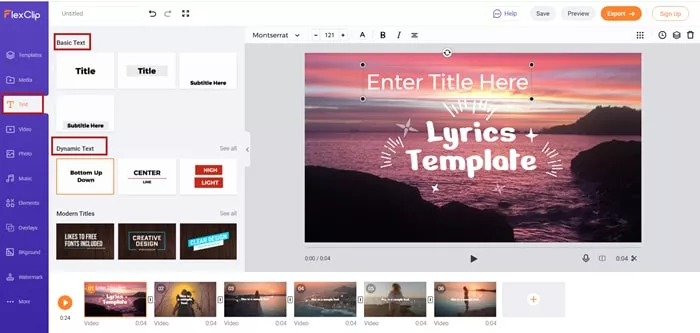
Add Text to Your Video Using FlexClip
Add some elements beside the text or use the already made textual overlay to build your brand and then adjust the duration.
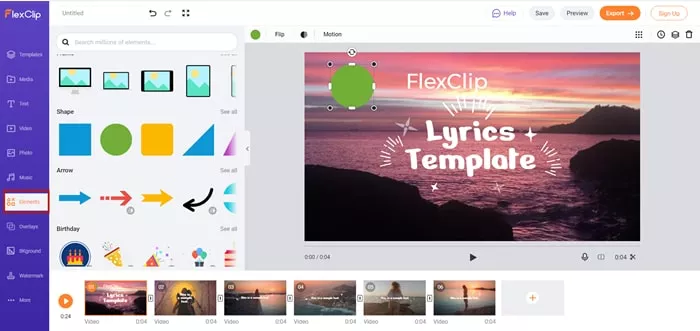
Add Elements to Your Video Using FlexClip
This is the last stage, preview your Video and make sure everything is intact. Export the video in an Mp4 (1080p) format.
Note:
Method 2: Add Moving Texts to YouTube Video Using YouTube Studio
This method is recommended for videos that have already been uploaded on YouTube. Here you can add either captions or subtitles. Below are the steps:
YouTube Studio Tutorial
Method 3: Add Moving Texts to YouTube Video Using Veed.io
Upload Videos to Veed.io
Click ‘Choose Video,’ select and upload your file to Veed. You can also drag and drop the video from the folder straight to the editor.

Add Text to Your Video Using Veed.io
Now it’s time to add your text. Click on the ‘Text’ menu located at the left side of the menu. Select from the numerous text styles and types. You can add as much text as you wish.
Method 4: Add Moving Texts to a Video using a Desktop
There is not much of a distinction between adding moving texts on your videos using a laptop, desktop, or mobile device. The only known difference is in its user interface. Again, the tool in use has a lot to do with the outcome. This is where we introduce the OpenShot Video Editor: a free and open-sourced video editor specifically designed for macOS, Chrome, Windows, and Linux OS. Launched in 2008, the tool has gained a lot of recognition and has been known to be the most stable, friendly video editor. Below, are steps to add moving texts to a start using OpenShot.
Method 5: Add Moving Texts to Your Video on Phone
Yes, just like on desktops, you can also add moving texts on videos using your smartphone. To succeed in this, the tool you use plays a significant role. There are many apps to help you do this but will recommend you use Quik. Quik is a video editing mobile app developed by GoPro, and it is very compatible with Android devices. One of the characteristics of this app is its animation features, they are simply amazing. Below, we have listed some step-by-step processes to help you add texts to your videos using your phone.
The Bottom Line
The evolution of videos will always give birth to new ways to present content to the audience, and adding texts on videos is one of many more to come. We urge you to stick to the methods we have listed above, we will also urge you to try out other features on FlexClip for your best promo video, tutorial video, real estate video, and many more. And don’t forget to share this article, you never can tell whom you will be helping out there.


FlexClip AI Video Maker
Reach professional-quality videos faster with easy editing tools, templates, and smart AI.
Start Now for Free
Hot & Trending
-

Best Ways to Find Music in YouTube Videos
-

Instagram Story Video Quality Bad After Upload? Fix It!
-

How to Repost Video on TikTok & How to Remove TikTok Repost
-

Improve Video Quality Online: 3 AI Video Quality Enhancers You Can't Miss
-

4K Convert to HD 1080p without Watermark: Best 4k Video Converters
-

Top 13 Birthday Video Makers with Music and Effects Free
-

How to Search Filters on TikTok & Use a Filter You See - TikTok Filter Guide
-

Large Collection of Creative and Funny Birthday Video Ideas for Ones You Care