Adding subtitles to your YouTube videos offers many benefits. YouTube subtitles allow your video content to reach wider viewers who speak a foreign language and make it easier for people who are hard of hearing to read your YouTube videos with text.
Besides, adding subtitles to YouTube videos can also increase YouTube watch time. So, with higher watch time, your videos are more likely to rank high on YouTube’s search list. You may also add subtitles for strong CTA for a promo video. What’s more, viewers can catch your YouTube videos without audio on.
So, in this post, we will walk you through how to add subtitles to YouTube videos in the 5 best ways. Then, you can automatically add subtitles to YouTube videos with ease.

Here is what you will learn:
Also, read how to make faceless YouTube videos with ChatGPT and AI video maker.
1. How to Add Subtitles to YouTube Videos Using YouTube Studio
Well, the official way to add subtitles to a YouTube video is by using YouTube Studio. It’s 100% free and offers you an easy way to upload and edit the subtitle and caption.
*Add YouTube Subtitles When Uploading a YouTube Video
Add YouTube subtitles when uploading a YouTube video
When you uploaded a video to YouTube, you will go through the “Video Elements” where you can add subtitles to your YouTube videos in the “Add Subtitles” section.
*Add YouTube Subtitles When a Video Has Been Uploaded
Log in to your YouTube account > go to the left “Subtitle” tab in YouTube Studio > click on the “Language” drop-down menu > add a specific language and click “add” under the “Subtitle” column.
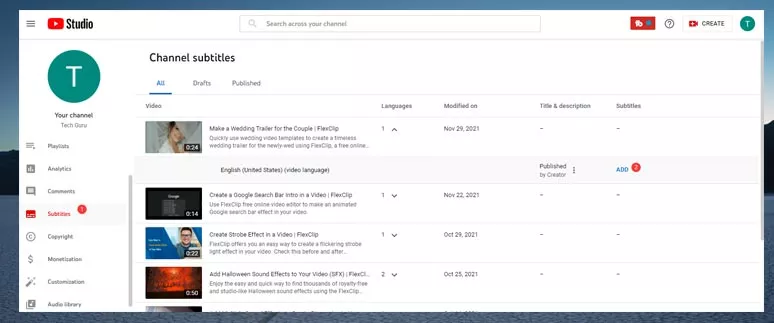
Add subtitles for uploaded YouTube videos
Once you click on the “Add” subtitle button, YouTube Studio offers you 3 options to add subtitles to a YouTube video:
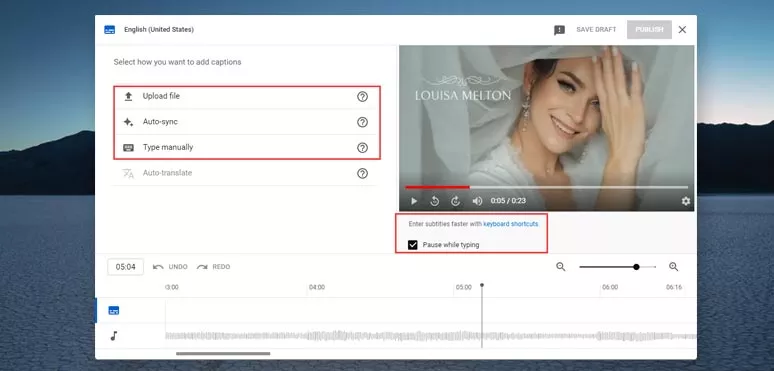
You have 3 options to add subtitles to YouTube plus keyboard shortcuts
Option 1: Upload a Prepared Subtitle File
A YouTube subtitle file can be an SRT file or a TXT file in which the subtitles of the speakers in the video and the timings of the texts are written. Once you upload it to the YouTube Studio, YouTube will automatically arrange the subtitles according to the timings.Also, read the 4 best ways to create srt files from video, audio, and text.
Option 2: Auto-sync the Transcript of a Video
You can manually type the transcript of the video with timing or copy and paste the transcript of a video > click on the “Assign Timings” button > YouTube Studio will automatically set subtitles timings for your YouTube videos.
Option 3: Type Subtitles Mannually
You can manually type in the texts as you watch the video and set the timing for each subtitle. To boost working efficiency, YouTube Studio also offers you keyboard shortcuts for editing.
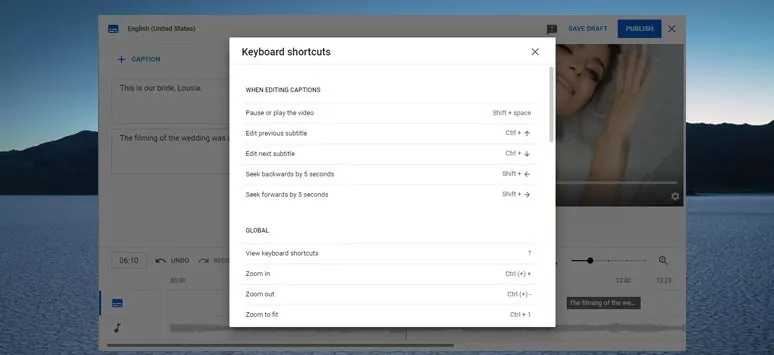
You may use keyboard shortcuts, trim subtitles, or zoom in/out to check for details.
To enable the keyboard shortcut feature, simply check the “Pause while typing” button and click on the “Keyboard Shortcuts”. Then a pop-up window will show you the hotkeys, like “shift+space = pause or play the video”, etc.
Or You can click and drag the caption to move it above the exact audio track and drag the slider to easily trim a subtitle or use the zoom in/ out tool to check whether your timeline is correct or not.
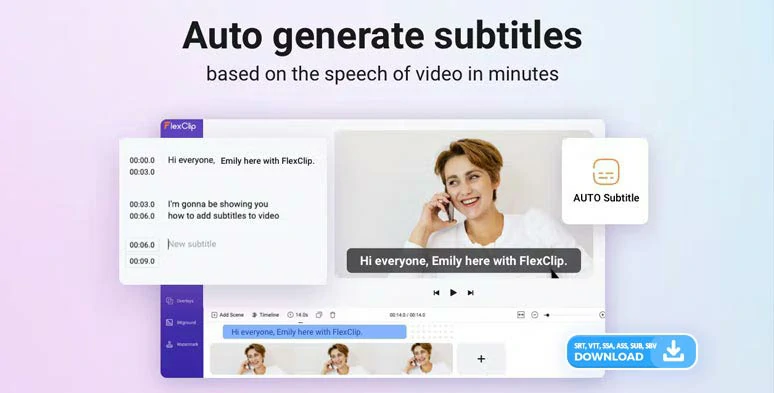
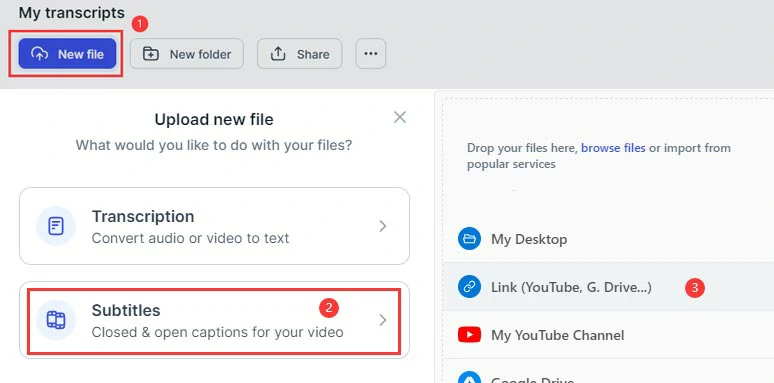
2. How to Add Subtitles to YouTube Videos Automatically Online
If your YouTube video is more than 25 mins and involves multiple speakers, then manually adding subtitles to YouTube videos would drive you crazy and eat up your precious time. That’s where FlexClip AI video maker comes in handy in adding subtitles to YouTube videos.
So, whether you are a YouTube content creator or new to making YouTube videos, the user-friendly and feature-packed FlexClip AI video maker, with its versatile AI auto subtitle generator and extensive AI tools, will be a great timesaver for adding subtitles to YouTube videos and streamlining your YouTube video editing process. So, you can sit back, sip a cup of latte and wait for the auto-generated YouTube subtitles to be ready.
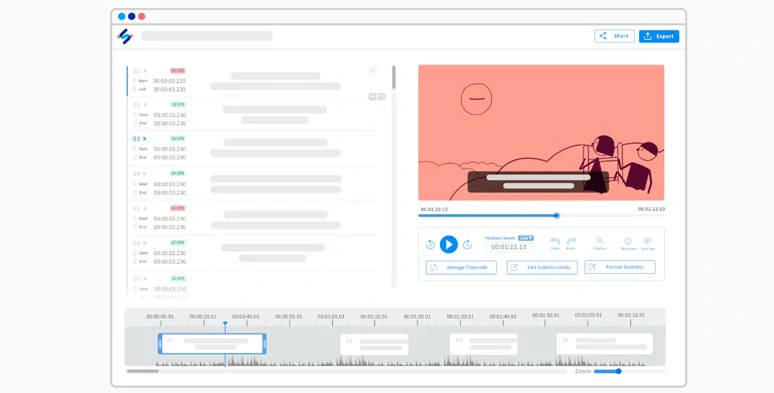
Automatically add subtitles to YouTube videos by FlexClip online in a breeze.

With FlexClip, you can:
Automatically add subtitles to YouTube videos by FlexClip AI auto subtitle generator.
Download the auto-generated subtitle of YouTube video in SRT or other 5 subtitle formats for closed captions.
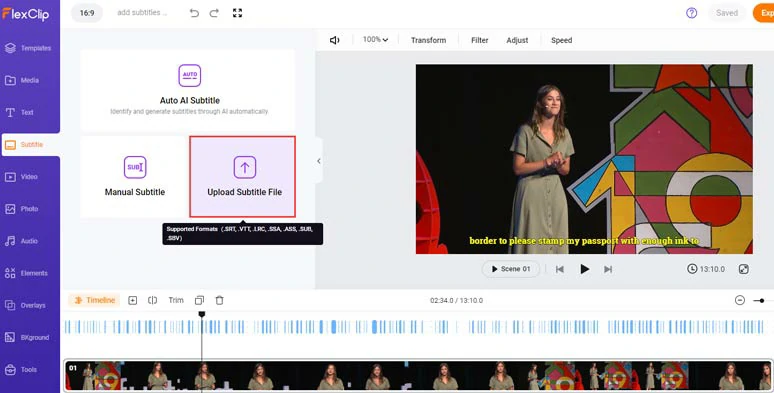
Directly upload an SRT file or other subtitle files to add subtitles to YouTube videos.


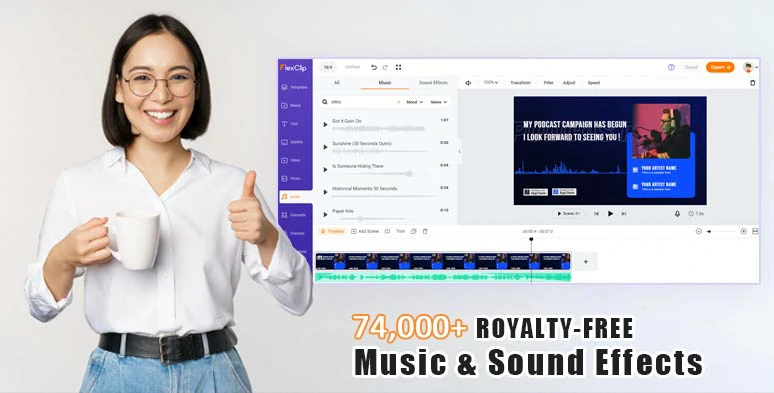
Use vast royalty-free music and sound effects for your YouTube videos.
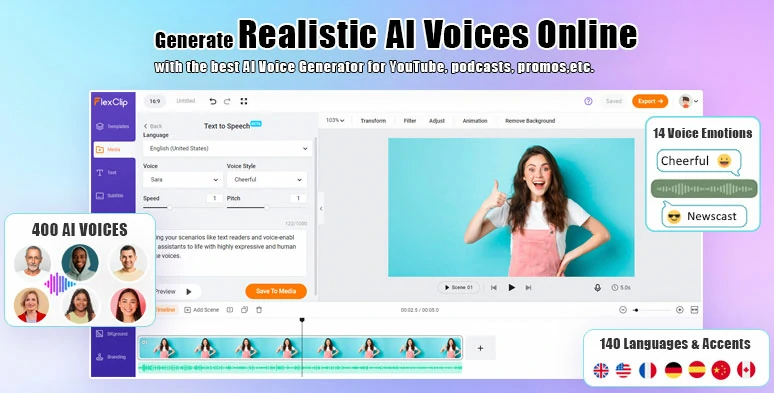
Effortlessly convert text to realistic AI voices for your YouTube videos.
So, now please walk with me to automatically add subtitles to YouTube videos by FlexClip online:
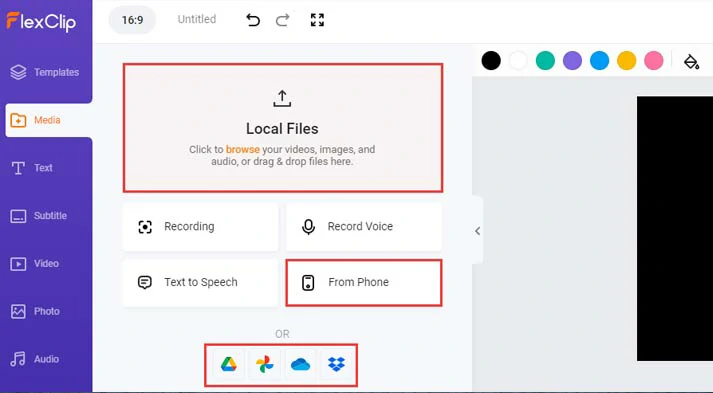
Upload your YouTube videos to FlexClip.
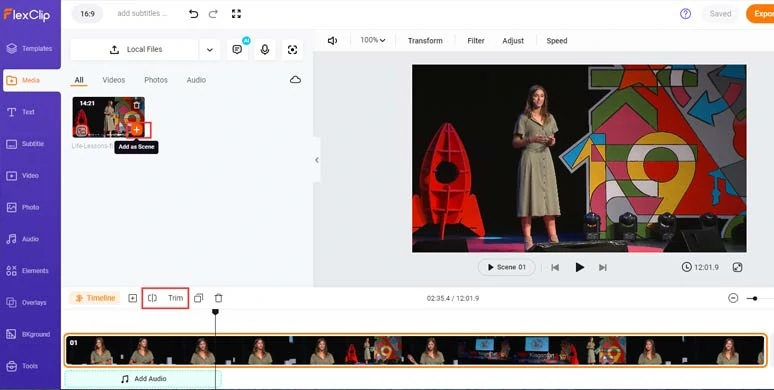
Add the YouTube video to the intuitive timeline and trim or split the video.
Click the Subtitle tab > Auto AI Subtitle > identify the language in your YouTube video > hit Next > select the style of subtitle, which can be changed later > press the “Generate” button. FlexClip shall automatically transcribe video to text for your YouTube video’s burned-in subtitles.
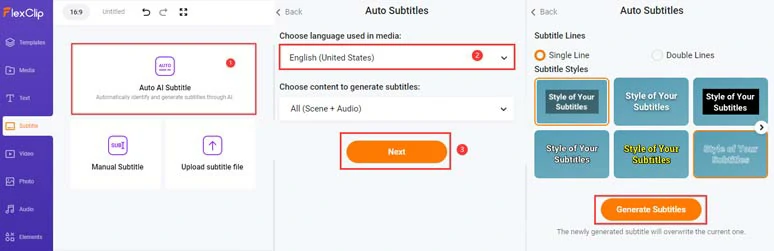
Auto-generate subtitles to YouTube videos with the click of a button.
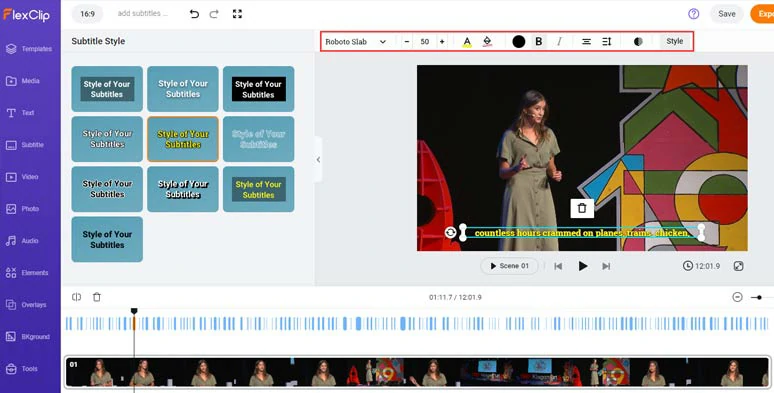
Now, you can proofread the auto-generated subtitles > correct any misspellings > tweak the style of the subtitle, such as text font, text color, size, color of text background fill, opacity, alignment, position, boldness, etc.
Proofread and fine-tune the style of subtitles.
If you find one subtitle too long, you can press “Enter” to split it or click the Merge icon to merge two short subtitles with ease. Pretty helpful!
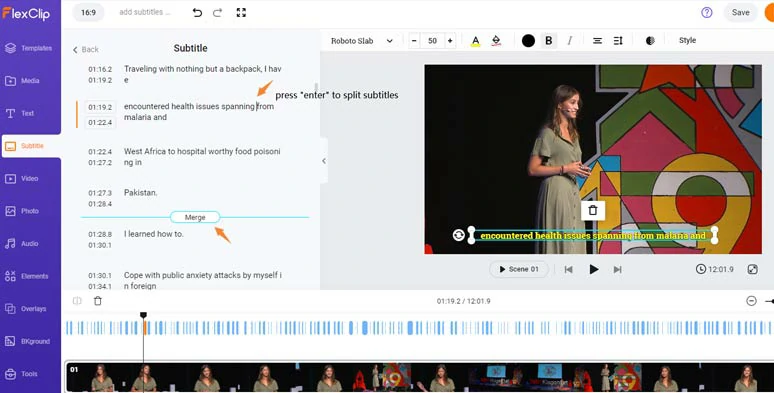
Easily split and merge subtitles.
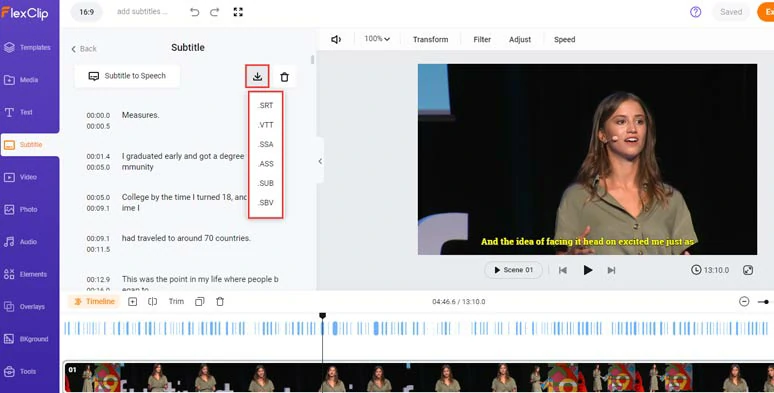
Alternatively, you can click the download button to save the subtitle of your YouTube video to SRT, VTT, SSA, ASS, SUB, or SBV file and later upload it to YouTube, Facebook, or other video hosting platforms for closed captions of your YouTube videos.
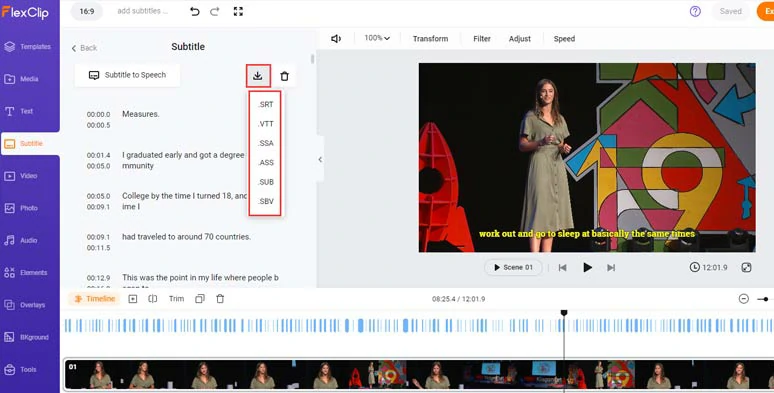
Download YouTube subtitles in SRT or other 5 subtitle formats for closed captions for YouTube, Facebook, Vimeo, etc.
If you are satisfied with the auto-generated YouTube subtitles, you can click the Export button to download the 1080P YouTube video with burned-in subtitles to your hard drive or directly share it to your YouTube channel or Google Drive, Dropbox, or even TikTok; a clickable link is available for your blog posts, newsletters or other repurposings. Super helpful!
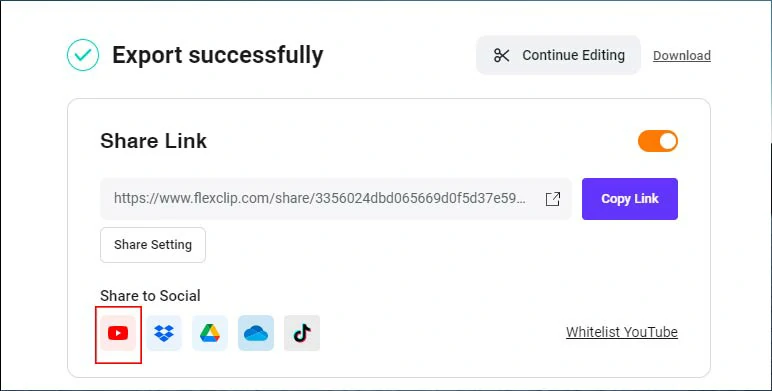
Easily share and repurpose your video content.
Alternatively, you can click the Text tab > scroll down to find more ready-made and editable text animations for your YouTube videos, such as YouTube Like, Share, and Subscribe buttons, YouTube profile titles, lower thirds, news titles, speech bubbles, quotes titles, call-out titles, search bars, location titles, etc.
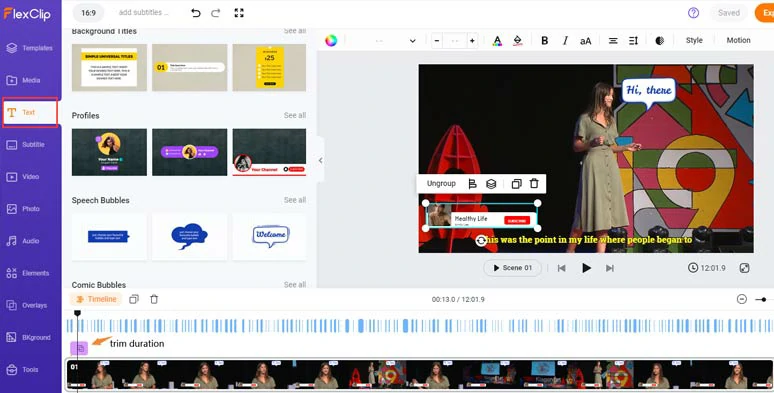
Use editable YouTube Like, Share, and Subscribe buttons and speech bubbles for CTAs.
With the text selected, clicking the Motion tool, you can easily animate the text with styles, such as typewriter, cinematic glossy blur, glitter, burst, neon, etc. for text reveal. You may trim the duration of text animations as well.
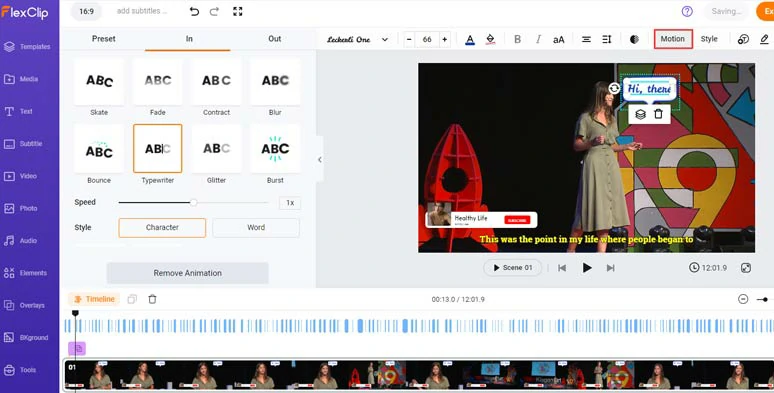
Easily animate the text with styles.
Then, click the Audio tab > search for keywords like “pop”, “funk”, “electronic”, cinematic” and “epic”, etc. to add royalty-free music to create the vibes for your YouTube videos; or search for keywords like “swoosh”, “woosh”, “whip”, “impact” and “hit” for text reveal and transitions.
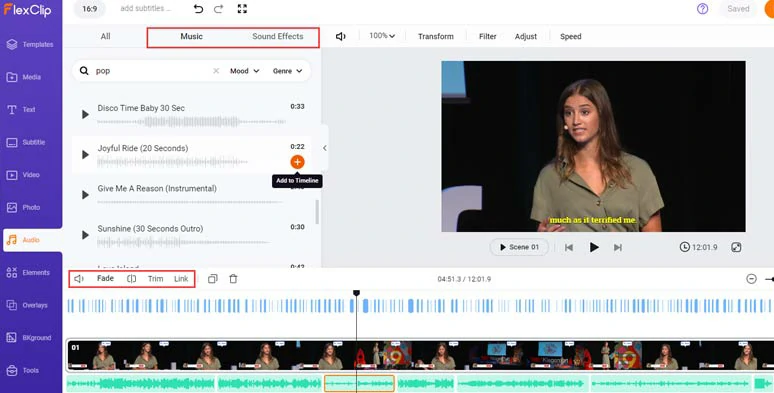
Add royalty-free music and sound effects to evoke emotions of YouTube video and enhance transition and text reveal.
A small trick is to layer multiple audio tracks to create real-world auditory experiences. You can easily trim and split audio tracks and adjust audio volume or apply fade in/out effects for seamless audio transition.
3. How to Add Subtitles to a YouTube Video That Is Not Yours
What if you have come across a valuable YouTube video that has no subtitles and you want to add subtitles to this YouTube video that is not yours to look back on later, or one of your friends asks your help to add subtitles to his/her YouTube video. So, is there an easy way to do it?
Well, the answer is yes and the tool you need is HappyScribe, a professional online tool, offering auto-generated and human transcription services.
Use Happyscribe to add subtitles to a YouTube video that is not yours online.
With Happyscribe, you can directly paste the URL of a YouTube video and add subtitles to that YouTube video automatically. Here is how to do it.
Paste the URL of a YouTube video to Happyscribe.
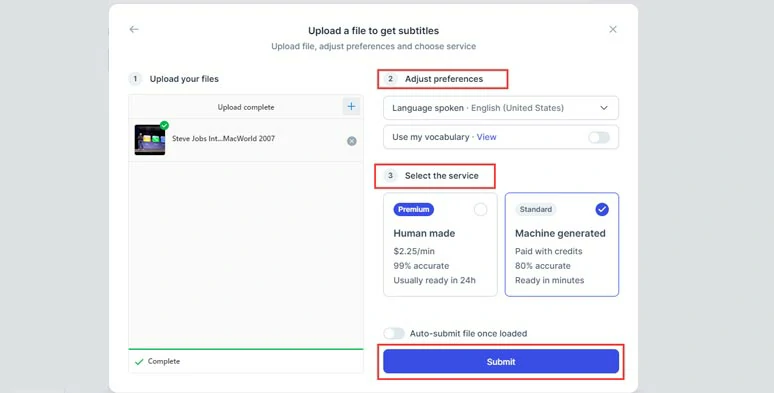
Select the source language in the video and choose either human or machine to generate subtitles.
If you have chosen the Machine Generate option, once the auto-transcription is done. You may open the auto-transcripted subtitles. You can manually correct the minor mistakes and add the name of multiple speakers at different timestamps, etc.
4. How to Add Subtitles to YouTube by Hiring Professionals
For long YouTube videos like documentaries with many terminologies, hiring a professional to add subtitles to your YouTube video can be a great alternative. Our recommendation would be to use the affordable human service offered by Rev($1.25/per min).
Use Rev’s human service to directly add subtitles on YouTube
Like HappyScribe, Rev has fine integration with YouTube. So, you can grant Rev access to your online YouTube video and then select the video you wanna add subtitles. Then pay for the service. Then the professionals will add subtitles to your YouTube videos within the agreed time. So, there is no need for you to upload an SRT file to your YouTube Studio and save your precious time.
Click on the “YouTube” icon > sign in Rev and grant Rev access to your YouTube account. So, Rev can download your YouTube video and directly upload subtitles to your YouTube videos. > select the video you would like to add subtitles > hit “Add Selected to Cart”.
If you are pressed for time, you can select “Rush My Order” by adding $1 more/ per min for human transcription service.
5. How to Add Subtitles to YouTube Videos Automatically on iPhone/Android
Well, if you are a content creator who often uses iPhone/Android to record and create YouTube videos and YouTube Shorts, then CapCut, a free and versatile mobile app with an auto-captioning feature, can be your ultimate choice to add subtitles to YouTube videos automatically on your mobile phone.
Add subtitles to YouTube videos automatically on your phone by CapCut.
The only downside is that since CapCut is built to edit short videos, you can only add auto subtitles to YouTube videos that are no more than 15 mins. Other than that, CapCut is almost flawless to add subtitles to YouTube videos automatically.
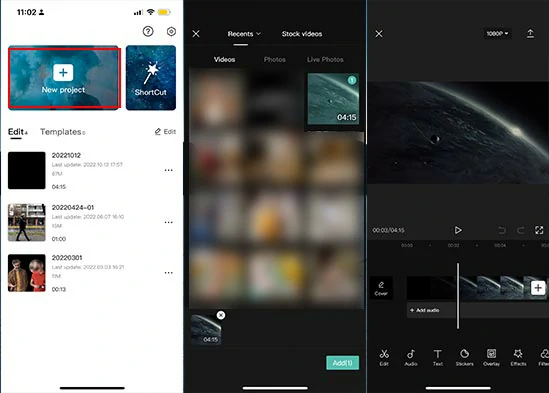
Import your clips to CapCut.
Tap Text > Auto Captions > select Orignal Sound and the language you wish the subtitles to be > tap Continue. Then CapCut will automatically add subtitles to your YouTube videos with impressive accuracy.
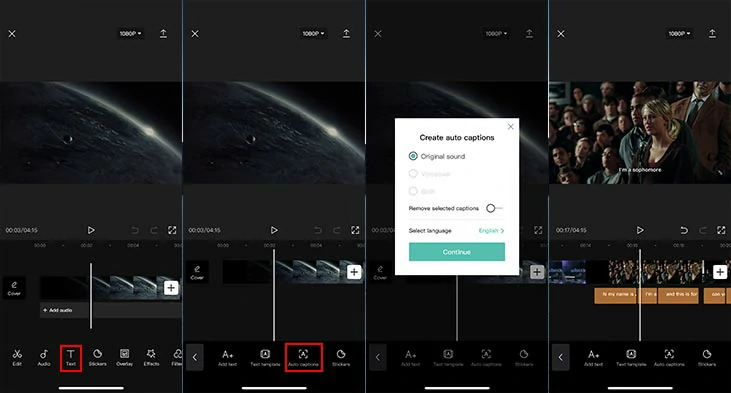
Add subtitles to YouTube videos automatically by CapCut.
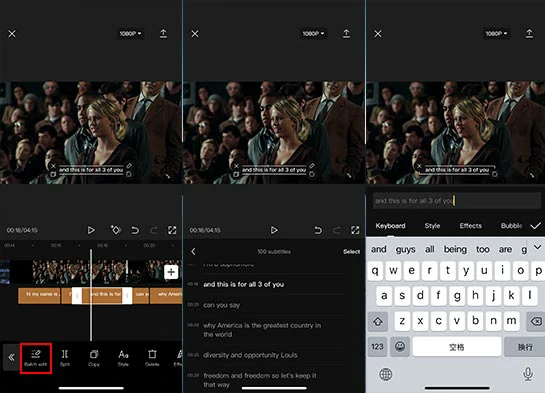
Edit subtitles in batch in CapCut.
Now, It’s Your Move
| Add YouTube Subtitles | Accuracy | Best Suited For | |
|---|---|---|---|
| YouTube Studio | Upload SRT file; paste transcript; type in manually; keyboard shortcuts; display single language subtitle; free | > 80% | short and long YouTube videos |
| FlexClip | Automatically add YouTube subtitles; transcribes both video and audio to text; easily stylize subtitles; upload subtitle files for YouTube videos or download subtitles in SRT and other 4 subtitle formats; tons of video templates; diverse AI tools; 4M+ videos, images and audio stock assets | > 90% | Add subtitles to all YouTube videos, esp.for YouTube content creators and newbies of YouTube video creation |
| HappyScribe | Paid machine-generated subtitle; paid human service ($2.25/min, 24hrs return) | >85%(AI); >99% (Human) | Long YouTube videos |
| Rev | Paid human service, including directly adding subtitles on YouTube ($1.5/min, 24hrs return, expedited subtitle service) | > 90% | Long YouTube videos |
| CapCut | Free mobile app with an auto-captioning feature, batch edits | > 85% | Creating short videos (less than 15 mins) on iPhone/Android |
So, these are the 5 best ways to add subtitles on YouTube. Now, the question is which solution works best for you to add subtitles to YouTube videos. Share this post on your Facebook and Twitter and leave your comments to us. Cheers!


FlexClip AI Video Maker
Reach professional-quality videos faster with easy editing tools, templates, and smart AI.
Start Now for Free
Hot & Trending
-

7 Best Ways to Find Music in YouTube Videos
-

Instagram Story Video Quality Bad After Upload? Fix It!
-

How to Repost Video on TikTok & How to Remove TikTok Repost
-

Improve Video Quality Online: 3 AI Video Quality Enhancers You Can't Miss
-

4K Convert to HD 1080p without Watermark: Best 4k Video Converters
-

Top 13 Birthday Video Makers with Music and Effects Free
-

How to Search Filters on TikTok & Use a Filter You See - TikTok Filter Guide
-

Large Collection of Creative and Funny Birthday Video Ideas for Ones You Care