Ken's Burn Effect is a special animation effect added to still pictures to make them animated and create an illusion of movement in a photography/picture to pique viewers’ interests and give the image a catchy look. Adding features like Pan, zoom, and fade transitions all come under this category of effects. Ken's Burn effect was initially known as Animantics but is now popularly known as Ken Burns effect in honor of the award-winning, highly esteemed documentary maker Ken Burns. It is used with the same name in video editing software sites and a slideshow feature in several presentation applications.
Can't Miss: How to Add a Voice over in iMovie on Mac and iPhone>
Where to use Ken Burns Effect?
Ken Burns Effect can be used anywhere, whether an advertisement, a social media post, a presentation, a greeting text, etc. This effect can help make any still digital picture animated and give it a lively and catchy look to attract viewers and prevent them from losing interest. Several transition effects can be added to the image to give it an animated appearance, and features like zoom and pan can be played with. A simple technique like using the Ken Burns effect on your image, if done right, can transform an ordinary photo into a viewer’s favorite.
How to Add Ken Burns Effect to Video with iMovie:
iMovie is one of the finest video editing apps available in the market, using which you can edit pictures and videos and add Ken Burns effects to any of your Mac devices. This Ken Burns iMovie app for Mac is popularly used and is a user's favorite due to its ease of use and the fantastic range of high-quality editing tools and options it provides, such as a vast range of transition effects.
Here’s how you can add Ken Burns effect to any video with iMovie using these simple steps:
Click on the Cropping Button
i. Set the crop at the beginning of the clip, and from the two available frames, select the Start frame. Then drag the frame and resize it till the start of the clip timeline is resized to your satisfaction.
ii. Set the crop at the ending of the clip, and from the two available frames, select the End frame. Then drag the frame and resize it till the ending of the clip timeline is resized to your satisfaction.
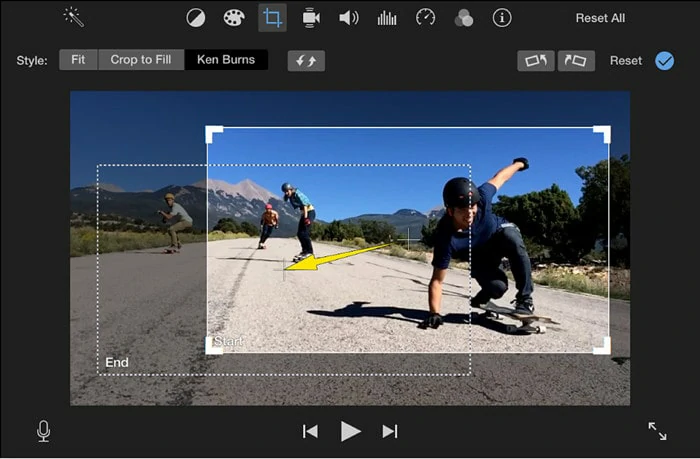
Add a Ken Burns Effect in iMovie
How to Add Ken Burns Effect to Video with Final Cut Pro
Final Cut Pro is another great option for Mac users to edit their videos and add Ken Burns effect on clips. It’s a user-friendly software that offers its users with several high-quality editing tools.
Here’s how you can add Ken Burns effect on your videos using Final Cut Pro:
The Ken Burns Effect in Final Cut Pro
The Bottom Line
This post provides a guide on the best applications to apply Ken Burns effect using a Mac device. If you found this helpful. Please give it a like or a share.


FlexClip AI Video Maker
Reach professional-quality videos faster with easy editing tools, templates, and smart AI.
Start Now for Free
Hot & Trending
-

7 Best Ways to Find Music in YouTube Videos
-

Instagram Story Video Quality Bad After Upload? Fix It!
-

How to Repost Video on TikTok & How to Remove TikTok Repost
-

Improve Video Quality Online: 3 AI Video Quality Enhancers You Can't Miss
-

4K Convert to HD 1080p without Watermark: Best 4k Video Converters
-

Top 13 Birthday Video Makers with Music and Effects Free
-

How to Search Filters on TikTok & Use a Filter You See - TikTok Filter Guide
-

Large Collection of Creative and Funny Birthday Video Ideas for Ones You Care