Speed ramp, also called time remapping, is one of the professional editing techniques that turns your clips into more eye-catching, cool videos. It may sound quite complicated, but it is easy to understand what the video speed ramp is and apply it to your video clips.

Part 1. What is a Video Speed Ramp
The video speed ramp means that the video speed gradually changes across the timeline. In another word, Videos with speed ramp change among normal speed, slow motion, and fast motion, but the change occurs slowly. Now, This video editing trick has been applied to many action movies, sports videos.
Video Speed Ramp Template
In case you haven’t made up your mind to use the video speed ramp, here are some of the best reasons why the video speed ramp is essential.
Part 2. How to Create a Speed Ramp with Premiere Pro
Lots of professional video editing tools are equipped with the speed ramp feature. Most people are using Premiere Pro. Easy, and effective. Follow us and create a speed ramp by yourself.
How to Do Speed Ramp with Premiere Pro
Part 3. Do Speed Ramp in a Much Easier Way
FlexClip is a much more easier-to-use and affordable tool to do speed ramp. Compared with Premiere Pro's $24 subscription price, it only costs $5.99 per month. When it comes to do speed ramping, all you need to do is finding the preset curve speed and apply to the video. You can make some customize, but all you need to do is dragging the slider. Click on the Create a Video button below and follow to do speed ramp with FlexClip.
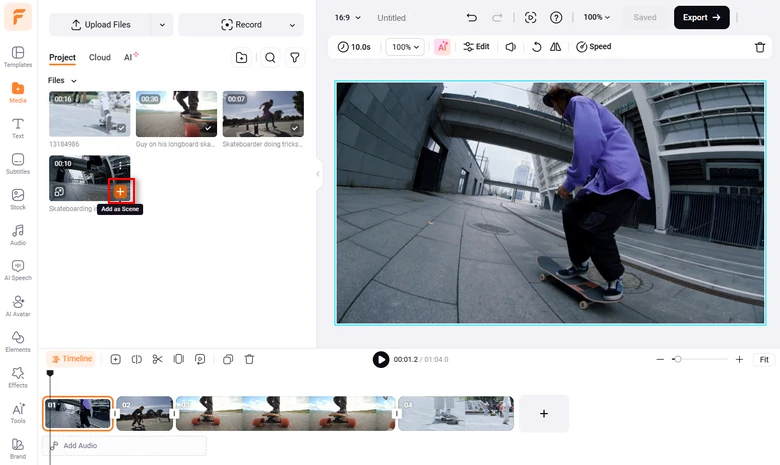
Upload Media Resources to FlexClip
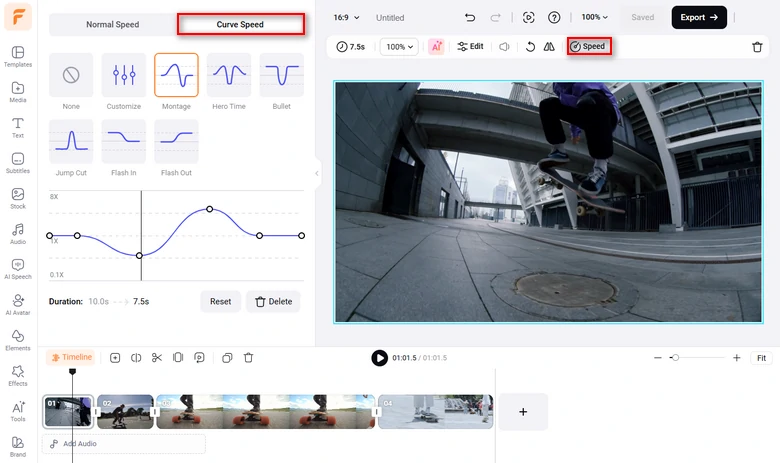
Do Speed Ramp with FlexClip
Part 4. Pro Tips to Use Speed Ramp While Editing Videos
Normally, people shoot videos in 24 frames per second. That’s far from enough for you to do speed ramping. Shooting your video with 120 frames minimal per second allows you to do speed ramping without sacrificing video quality.
Not all video clips are good for doing speed ramping. You should look for footage with strong visual elements that can be emphasized through speed changes, for example, clips of running, dancing, or jumping.
Let music go with the video can never go wrong. Never mind about the ramp. Find a piece of music whose beats match where the video speed changes.
Conclusion
Video speed ramps are a fantastic tool for adding excitement, emphasis, and visual interest to your videos. By understanding the basics, exploring advanced techniques, and following the tips provided, you can master the art of using speed ramps and elevate your video editing skills. So, unleash your creativity and take your storytelling to new heights with the power of video speed ramps!


FlexClip AI Video Maker
Reach professional-quality videos faster with easy editing tools, templates, and smart AI.
Start Now for Free
Hot & Trending
-

Best Ways to Find Music in YouTube Videos
-

Instagram Story Video Quality Bad After Upload? Fix It!
-

How to Repost Video on TikTok & How to Remove TikTok Repost
-

Improve Video Quality Online: 3 AI Video Quality Enhancers You Can't Miss
-

4K Convert to HD 1080p without Watermark: Best 4k Video Converters
-

Top 13 Birthday Video Makers with Music and Effects Free
-

How to Search Filters on TikTok & Use a Filter You See - TikTok Filter Guide
-

Large Collection of Creative and Funny Birthday Video Ideas for Ones You Care