When editing videos, the creator must know and identify which clip is essential to keep the file engaging. That is one of the crucial parts of editing a video file. Usually, the videographer will produce several versions of the same scene to have variety and not to bore the audience. However, that is not enough as a simple cut to cut of clips won’t bring life to a video when exported. That’s why lower thirds must be utilized to level up a video.
The lower thirds is the text or graphic you see at the lower part of the screen. It is often used on TV shows enclosing the name and the position of the person being featured. That way, people will know right away who the person is and why they are included in the video. Moreover, lower thirds not only help with the identification, but it is also an instrument that can be used for marketing. Using such text and graphics in a video will allow a smooth transition of info to the viewers, making everything you show understandable.
Adobe Premiere Pro, commonly known as Premiere Pro, is an editing app produced by Adobe. Most employees working in an advertising agency or TV production use this app because of its features. If you’re new to editing and got a question that revolves around how to create lower thirds in premiere pro, like any other editing app, here is the answer. Follow the methods below.
How to Create Lower Thirds in Premiere Pro
Like other editing apps, Premiere Pro is a great choice when it comes to creating lower thirds. The app is relatively easy to navigate, primarily if you use the other products of Adobe (e.g., Photoshop, InDesign, Audition, etc.). When using this editor, the main thing you must worry about is the type of file of your video. Make sure that it is a supported file. That way, you’ll be able to add lower thirds in the selected clip smoothly.
So, how to add lower thirds in Premiere Pro? See the step-by-step instruction below:
Always ensure to apply the hierarchy of importance in this field. Meaning, you must utilize the font style and font size to let the viewers know right away which info to focus on.
If you are not pleased with the current look of the background, you can still customize it the way you want. From its color to the opacity level of the shape, you can tweak it for a better look.
Now, I understand if you want to make the created lower thirds on the professional side. One way to do that is by adding transitions to the created lower thirds. That way, it can appear and disappear at the specified clip you want them to be. To do that, do follow the steps below!
You may also influence the effect on how fast or slow the transition would be. Just prolong or shorten the transition you added and see the effect. There’s no right or wrong decision in this part, as it will depend on your intuition and creative eye whether the transition is low enough or fast enough for the theme of the project.
How to Make Animated Lower Thirds Titles in Adobe Premiere Pro CC
Using Premiere Pro is excellent in any way. Not only that it offers multiple features, but it is perfect for other projects as well. However, the only downside of this app is it is not free. It is possible to use the free trial, but it will only last for seven days. That’s why, if you are looking for a free editing tool that is accessible anytime, FlexClip is the one for you!
FlexClip is an online editor that allows the user to create several contents. Not only is it a free online editor, but it also consists of numerous free lower thirds Premiere Pro doesn’t have. These ready-to-use templates are available in their library and can be customized the way you want them to appear. Simply select and drag the template to your uploaded video clip and edit the style of the lower thirds graphic.
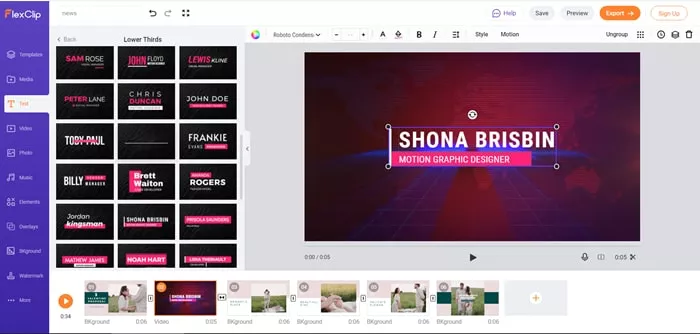
Use FlexClip Lower Thirds Function
It may seem to be too good to be true, but FlexClip is also a reliable editing app. Moreover, if you need other tools to elevate your clip further, FlexClip also offers other tools for that matter.
The Bottom Line
Editing videos may be a hassle task, especially if you are not aware of the techniques you can apply to improve your videos. The lower thirds is one of them, and is very easy to create and customize. Using such a method allows you, the creator, to engage with your viewers right away. Thus, boosting your video material even more.
FlexClip, as mentioned, is one of the best online editing tools you can use for creating lower thirds. Plus, it is accessible and easy to navigate, which promotes efficiency. With its available templates online, there’s no need to create lower thirds from scratch. Choose wisely and elevate your video projects with this editing app!


FlexClip AI Video Maker
Reach professional-quality videos faster with easy editing tools, templates, and smart AI.
Start Now for Free
Hot & Trending
-

Best Ways to Find Music in YouTube Videos
-

Instagram Story Video Quality Bad After Upload? Fix It!
-

How to Repost Video on TikTok & How to Remove TikTok Repost
-

Improve Video Quality Online: 3 AI Video Quality Enhancers You Can't Miss
-

4K Convert to HD 1080p without Watermark: Best 4k Video Converters
-

Top 13 Birthday Video Makers with Music and Effects Free
-

How to Search Filters on TikTok & Use a Filter You See - TikTok Filter Guide
-

Large Collection of Creative and Funny Birthday Video Ideas for Ones You Care