Oftentimes, you must have noticed that professionally edited clips and videos on the internet don't come with their original audio. Instead, the original audio track is replaced by another audio track which changes the whole vibe of the video and takes it to a whole new level. You must be wondering that why video editors would want to remove audio from a video?
Well, there are actually quite a number of potential reasons behind this. At times the videos tend to have unpleasant background noise such as footsteps or people chatting in a marketplace or something similar. Consider a situation where you're in a busy street capturing the beautiful clouds above you in a video, but all the surrounding noise ruins the whole vibe of the video, you wouldn't want that now, would you? That's why removing audio from video becomes an essential thing to do in some cases.
Among all the video editors, Premiere Pro manages to score a position at the top of the list for a majority of the video editing community. It is frequently used and is preferred for minor and major editing tasks by many people out there. Now, let’s get started to learn how to remove audio from video in Premiere Pro.
How to Remove Audio from Video in Premiere Pro
Being a professional editing software, Adobe Premiere Pro tends to offer quite some flexibility and features when it comes to video editing. Listed down below are the steps that would answer your query of how to remove audio from video Premiere Pro.
So, without further ado, let’s get started!
How to Remove Audio in Premiere Pro
How to Remove Audio from Video in an Easier Way
Undoubtedly, with the right tool at your disposal, removing the audio from any video won’t be a difficult task at all. FlexClip happens to be an all-in-one video editing software that has been specifically designed to serve the needs of people regarding video editing. FlexClip tends to be a great tool to remove audio from video for a number of different reasons.
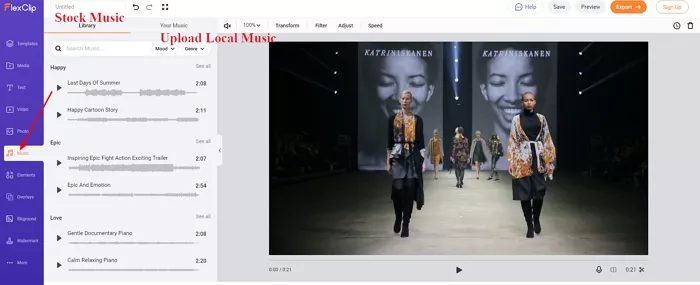
The first and the most convenient reason why you should consider FlexClip for video editing tasks is that you won't necessarily have to download the application, which simplifies the whole process since you would be able to perform pro-level editing on their website. Moreover, FlexClip offers a rich media resource library, so if you wish to replace the original audio with any other background music audio, that won’t be a challenging task at all. In addition to that, you wouldn’t want to wait hours for the edited video to be exported to your laptop, right? Luckily FlexClip offers a fast export speed without affecting the quality of the video, so it really does come in handy.
Now, let’s try FlexClip to remove audio from video.
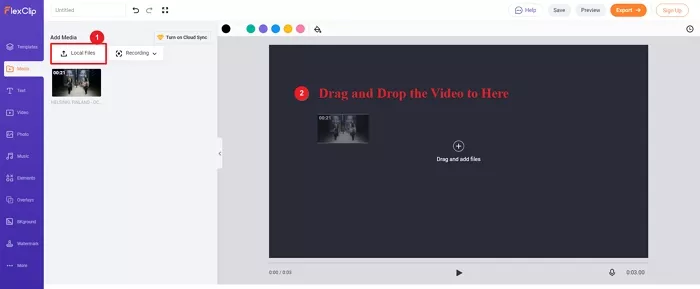
Remove Audio from Video in an Easier Way - Step 1
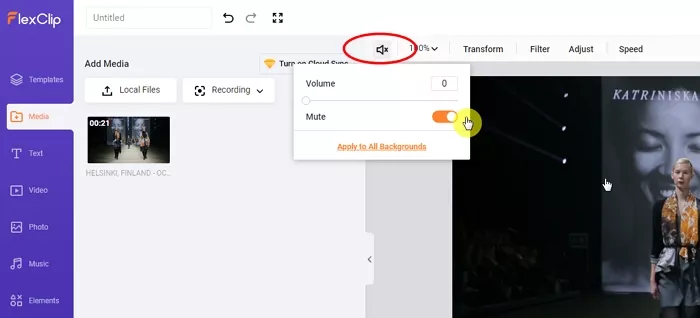
Remove Audio from Video in an Easier Way - Step 2
Remove Audio from Video in an Easier Way - Step 3

Remove Audio from Video in an Easier Way - Step 4
Bottom line
With professional video editing tools such as Adobe Premiere Pro and FlexClip, you would be saved from re-doing the entire video if the audio in it isn't the way you wanted it to be. Now that you possess the knowledge of removing the audio from the video and have these tools at your disposal, put that into practice and make your life easier! Whether you casually edit videos or you're a regular content creator, you are advised to explore FlexClip as it offers great sound effects in its music library that give your videos a brand new look. Remember to give it a try!


FlexClip AI Video Maker
Reach professional-quality videos faster with easy editing tools, templates, and smart AI.
Start Now for Free
Hot & Trending
-

7 Best Ways to Find Music in YouTube Videos
-

Instagram Story Video Quality Bad After Upload? Fix It!
-

How to Repost Video on TikTok & How to Remove TikTok Repost
-

Improve Video Quality Online: 3 AI Video Quality Enhancers You Can't Miss
-

4K Convert to HD 1080p without Watermark: Best 4k Video Converters
-

Top 13 Birthday Video Makers with Music and Effects Free
-

How to Search Filters on TikTok & Use a Filter You See - TikTok Filter Guide
-

Large Collection of Creative and Funny Birthday Video Ideas for Ones You Care