After intense thinking and planning, you finalize the shoot location and the time of the day that will allow you to capture the best possible shots ever. But unfortunately, clouds decided to cover up the sunlight you will need for beautiful pictures on the same day.
Delaying the shoot is not an option, and if you use the raw images, you will have the most boring results. When such problems arise where the video lacks bright lights and colors, you can fix it with the Premiere Pro app.
Premiere Pro offers the most terrific Video color correction tools that can help you transform your videos into eye-catching masterpieces. Before getting started, let’s get to know what color correction and color grading are.
Color Correction VS Color Grading
The post-production process of a video includes two main procedures: color correction and color grading. It’s essential to understand the prime difference between color correction and color grading.
Color Correction
Color correction is the process where we adjust the exposure, balance white and black values, and boost the contrast of the video as per our liking to enhance the colors of the shots that make them look more appealing. It makes the image look clean, more natural, and similar to what human eyes see in the real world.
Color Grading
Color grading is performed after color correction. It is a skill that helps you exhibit your creativity as it enables you to change the visual tone of the shots. The best example to understand this is the green tint often seen in the famous movie The Matrix. Color grading adds an atmosphere and emotions that are often artificial and supernatural.
How to Do Video Color Correction with Premiere Pro
Working in the creative field of digital content creation demands at least a basic know-how of Premiere Pro, and if mastered, it can serve as the deadliest weapon to create mind-blowing content. It is a professional tool that is packed with the most incredible features.
Let’s learn how Color correction Premiere Pro works.
Once you have upgraded your Premiere Pro to its latest version, launch the program and import your video to Premiere Pro. Then simply drag your video on the timeline you wish to color correct. Before initiating your color correction process, complete all the editing operations beforehand.
A new adjustment layer enables you to use the same color corrections on several video parts. It saves time when you need to apply similar effects on several clips. However, check the impact on all clips as they could be under or overwhelming in some clips than others.
Apply the adjustment layer to the clips on the timeline you wish to exit. Then in the effects panel, go to the Lumetri color Option and drag and drop it to the adjustment layer.
In the Lumetri color panel, open up the primary correction tab, where you will find an auto button. It will create impressive results, but you can adjust it according to your liking. Adjust the intensity slider for desired results.
Once done, click on the check box next to the basic correction if you wish to see the changes made.
Automatic Color Correction in Premiere Pro 2022
How to Do Video Color Correction with Online Tools
No matter how excellent Premiere Pro is, it is a professional tool that requires expertise to master it and create extraordinary results. Besides, the tool is pricey and complicated even for many professional content creators.
Want to know an equally powerful, easy-to-use tool that will bring a standing ovation for your remarkable work? Try FlexClip. FlexClip is a free online tool that can help you add the right amount of color, energy, and ambiance to your video without breaking your bank. It’s easy to use, and remarkable resources, filters, and presets are just as terrific as Premiere Pro.
Interested to learn how color correction video editing works in FlexClip, then keep reading below:
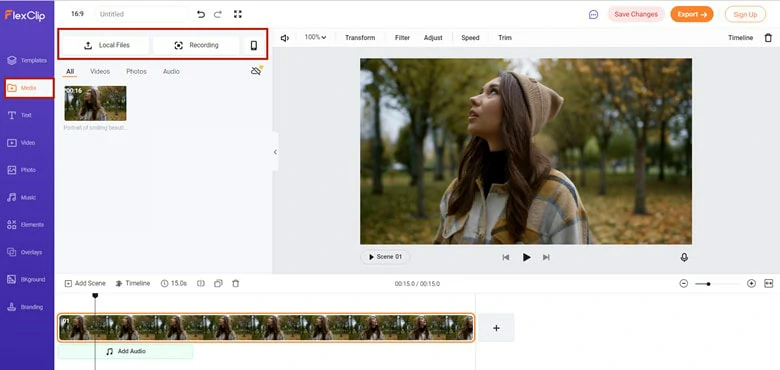
Upload Media Resources to FlexClip


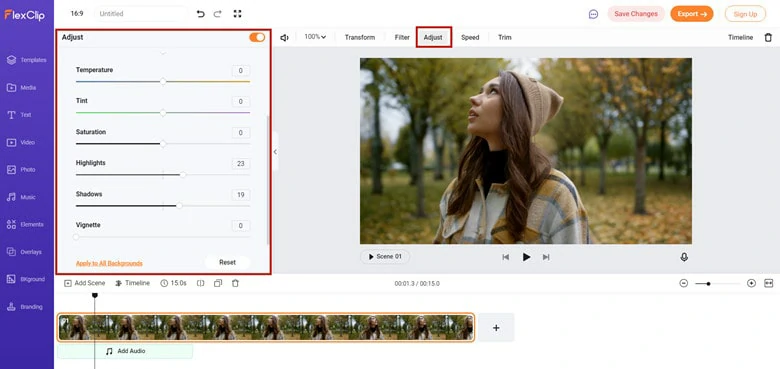
Use the Adjust Tool to Do Color Correction Video Editing
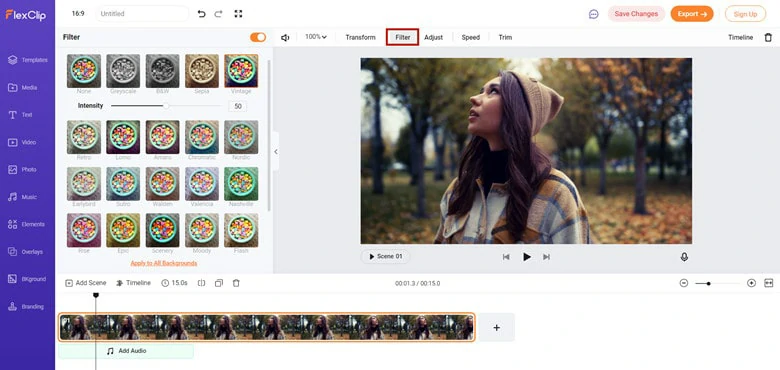
Add a Filter to Polish the Video
The Bottom Line
Creating content has become exciting and convenient after the launch of excellent tools like FlexClip. It is the dream of every content creator. But be sure to balance tones, hues, and shades. It should not be too obvious nor too light to make an effect.
We hope you enjoyed our little guide; give it a try, and do not forget to share it with your friends.


FlexClip AI Video Maker
Reach professional-quality videos faster with easy editing tools, templates, and smart AI.
Start Now for Free
Hot & Trending
-

7 Best Ways to Find Music in YouTube Videos
-

Instagram Story Video Quality Bad After Upload? Fix It!
-

How to Repost Video on TikTok & How to Remove TikTok Repost
-

Improve Video Quality Online: 3 AI Video Quality Enhancers You Can't Miss
-

4K Convert to HD 1080p without Watermark: Best 4k Video Converters
-

Top 13 Birthday Video Makers with Music and Effects Free
-

How to Search Filters on TikTok & Use a Filter You See - TikTok Filter Guide
-

Large Collection of Creative and Funny Birthday Video Ideas for Ones You Care