Briefs: Blender complex interface makes many users confuse and don't know how to use Blender for video editing. So, we share its beginner tutorial - "How to use Blender video editor from zero?". In case someone wants a handy solution, we introduce another easier, free alternative to Blender video editor - FlexClip.com.
Nothing beats a freebie, especially a powerful freebie. When it comes to video editing, it's no exception. The world-leading, open source Blender video editor is always in priority choice.
Blender is a free, advanced & open source software for all kinds of visual designs(including, 2D, 3D, and vectorized animation designs). Video editing is just a piece of cake for Blender.
CONTENTS
Part One - How to Use Blender Video Editor to Edit Videos? - Beginner Tutorial
For beginners who want to learn using Blender video editor for video creation, the beginner tutorial will walk you through how to make or edit videos with Blender studio step by step. No worry about its complex learning curve!
Step One.Download & Install of Official Blender Studio for Free
- Blender Official Site: https://www.blender.org/
- Blender Official Downloads: Windows, Mac, Linux, and Steam
Blender supports a variety of OS, including Windows, macOS, Linux, and Steam, and all of these editions are available for free downloads. Choose the right installer for your computer and install it. During the setup, it's best to choose to install entire features, once and for all.
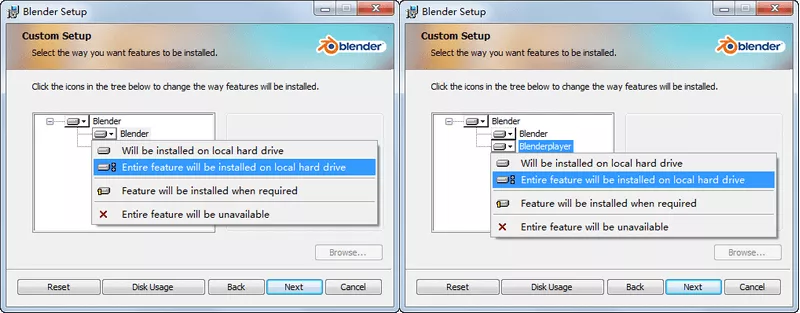
Image: Install entire Blender features.
Step Two.Switch Blender Interface to Video Editing Workspace
The first time you open Blender studio, you'll see its 3D animation creating interface. In order to use Blender video editor, you need to change the default workspace to "Video Editing" manually. The switch button is hidden in a pull-down list (it's not obvious), and you can find it next to the main menu (right after "Help").
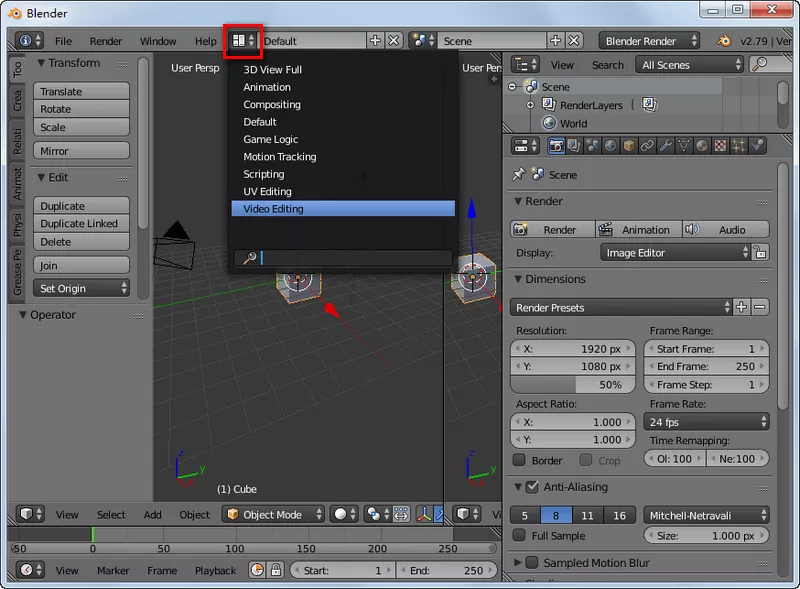
Image: Switch Blender interface to video editing workspace.
When Blender interface is switched to "Video Editing", things will appear familiar and easier. If you had experiences with some video editing software before, and you will figure out how to use Blender video editor with a dozen of tries.
Step Three.Get to Know Blender Video Editor for Navigation
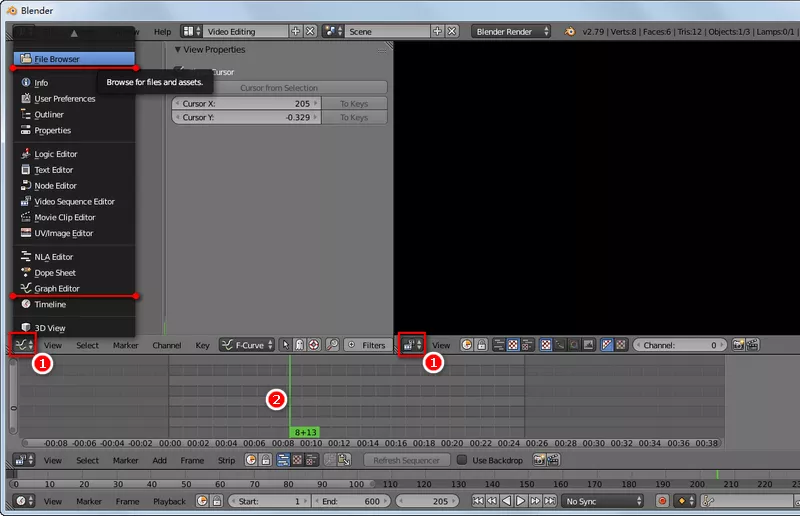
Image: Key buttons for Blender video editing.
We've made a screenshot of Blender video editing interface for your easier understanding. To edit with Blender video editor, you need to know 2 marked icons:
- Marked 1 icon (feature/browser icon): Blender feature/browser button allows you to access/change to different workspaces. For fresher, this icon will save you from accidentally switching an active windows to another, and it can take you back to your previous workspace.
- Marked 2 vertical green bar(beginning line): It's where your video clip will be added. If you haven't inserted any clips yet, it's where your video content starts.
Step Four.How to Add Video Footage and Audios? [Step by Step]
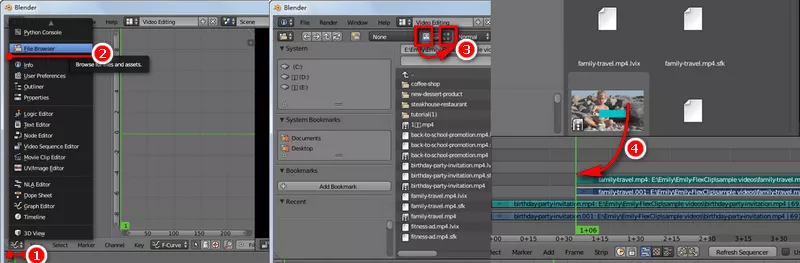
Image: Add footage and audios in Blender video editor.
Phase 1 Hit browser icon 1, go [File Browser] in the push-down list, and change the path to your footage folder.
Phase 2 Switch the display mode to Thumbnails preview. – This step is important. Or you can barely drag and drop any footage to your current video timeline in step three. (Timeline is named "video sequence editor" in Blender).
Phase 3 Add footage and audios to Blender "video sequence editor" with drag-and-drop.
Phase 4 Download your editing video to MP4.
Part Two - Essential Tricks to Use/Navigate Blender Video Editor
Blender adopts completely different commands (from mainstream video editors), and you may find it uncomfortable to navigate it at your first try.
In the interface of Blender video sequence editor, mouse scrolling alone will bring you the effects of zooming-in and zooming-out. When you hold "Ctrl" and scroll the mouse at the same time, the timeline will move to the left and the right.
In additional, we've also compiled the most useful Blender commands for your reference:
- ->Blender Mouse Click Function:
- Left click will place footage starting bar(vertical green bar). Right click will select a sequence/track.
Tip 1
- ->How to Insert a Video Clip in a Specific Spot in Blender?
- Left click will place the green bar that's the beginning of a clip. You can put it at the time point of 0+00, or elsewhere. (Note: Grey section clips will not be shown in final video production.)
Tip 2
- ->How to Add Video Footage in Blender?
- Drag and drop video footage from Thumbnails File Browser.
Tip 3
- ->How to Delete a Track in Blender?
- To delete a track, you need to right click it, keystroke "X" and hit "Enter".
Tip 4
- ->How to Adjust or Move a Video Sequence/Track in Blender?
- Re-organizing a sequence requires you to right click a sequence/track firstly; press "G" secondly; move the mouse to move the video track thirdly; and left click to finalize the position of your selected sequence finally.
Tip 5
- ->How to Split One Video Clip into Two Clips in Blender?
- Left clip to place the green bar in the video track, Keystroke "K". After that, your selected clip will get split into 2 clips.
Tip 6
- ->How to Increase Video Length in Blender?
- Move to the bottom of Blender interface, set "End:" parameter to a larger number.
Tip 7
- ->How to Preview Your Video Editing in Blender?
- Keystroke Alt + "A", it will play your video automatically.
Tip 8
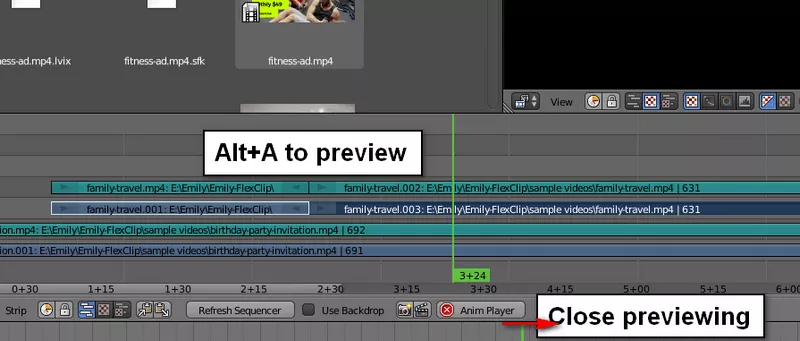
Image: Preview video in Blender video editing software.
- ->How to Output Your Editing Video to MP4 instead of PNGs in Blender?
- Step 1: Switch feature icon to "Properties" feature.
- Step 2: In "Display" pull-down list, change it from "Image Editor" to "Keep UI".
- Step 3: In "Frame Rate", click "Custom (29.87fps)" in black and pick "24fps". (If you don't customize the frame rate, you'll get an error message - "Encoder timebase is not set blender".)
- Step 4: In "Output", change the default path from "/tmp\" to "/tmp\myvideo.mp4". (You can change "myname" to any other word to rename the output video.)
- Step 5: In "PNG" pull-down list, change its value to "FFmpeg video".
- Step 6: Keystroke "Ctrl + F12" to render (download) the MP4 video file for download.
Tip 9
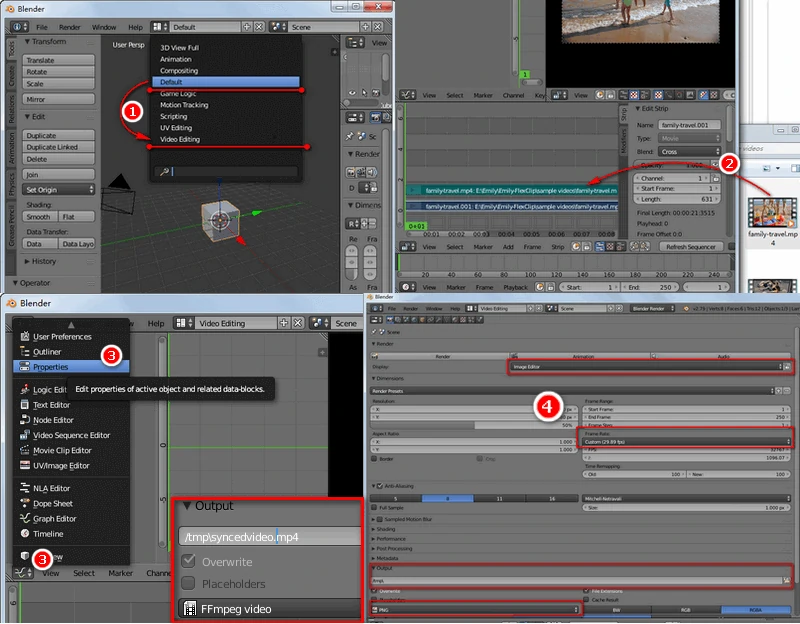
Image: How to output your editing video to MP4 video in Blender?
For a beginner, to make standard video editing, you need to remember a couple of shortcuts & commands, and use them correctly. What if you dislike memorizing shortcuts? Or hate to repeat the steps according to a reference book?
For the moment, Blender studio hasn't offered users an easier solution (It's still a complex tool). That makes a more straightforward alternative very pleasing: flexclip.com.
Part Three: An Alternative to Blender Video Editor[Easy & Free]
After nearly 1-year hardworking from 10 advanced SaaS developers, the project - FlexClip Video Editor for all level users - has been finished and released successfully.
From human test reports and real user data, all FlexClip users enjoy designing a video with an open mind. Its extensive resource library (1000,000+ footage and images) provides more possibilities and inspirations for users. Its streamlined interface makes video editing at your fingertips.
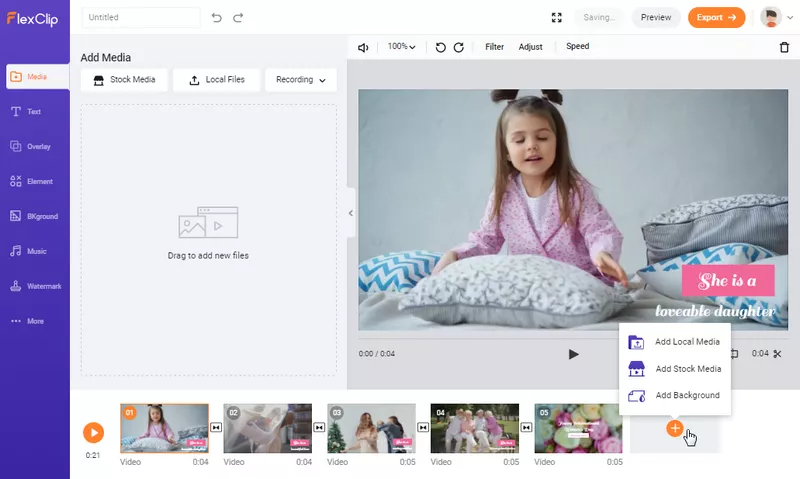
Image: Blender Video Editing Alternative - FlexClip free online video editor.
Splitting(scissor icon) and merging footage are easier than Blender editor. And thanks to applying storyboard architecture, you don't have to set the video length, which is a must in Blender. FlexClip will automatically extend video length for you.
In FlexClip, what you preview is what you get. You can download the video production in the preview window, and it will be saved as MP4 video in 1080P, 720P, or 480P.
Another Highlight: FlexClip offers a ratio of 16:9, 1:1, and 9:16 for desktops, Facebook, and smartphones respectively.